How to: Create a virtual joystick for a mobile UI
7/19/2024
Mihail Todorov
In the ever-evolving world of mobile gaming, providing intuitive and responsive controls is crucial for an engaging user experience. One popular solution is the virtual joystick, a touch-based control system that mimics the physical joystick. In this blog post, we’ll explore how to create a virtual joystick for your mobile games, enhancing gameplay and user interaction.
Previewing the sample
To see the sample live you can find the whole project in the ${Gameface package}/Samples/uiresources/UITutorials/MobileControls directory.
Creating the joystick itself
To get started we first need to create the joystick itself.
To do that we’ll add the following HTML code:
1<div class="joystick">2 <svg class="joystick-outline" viewbox="-7 -7 310 310">3 <path4 d="M150,0 A150,150 0 1,1 150,300 A150,150 0 1,1 150,0"5 fill="none"6 stroke="rgba(255, 255, 255, 0.4)"7 stroke-width="5"8 stroke-dasharray="205 30"9 stroke-dashoffset="221"10 />11 </svg>12 <div class="joystick-handle-container">13 <div class="joystick-handle"></div>14 </div>15</div>Here we have the joystick outline which will be a big circle with a dashed border, hence why we are using an SVG to be able to control the dashes and the spacing using the stroke-dashoffset and stroke-dasharray properties._createMdxContent
Finally to complete the look of our joystick we’ll style it using the following CSS:
1body {2 width: 100vw;3 height: 100vh;4 overflow: hidden;5 margin: 0;6 padding: 0;7}8
9.joystick {10 width: 20vmax;11 height: 20vmax;12 position: absolute;13 bottom: 1vmax;14 left: 1vmax;15 background-color: rgba(0, 0, 0, 0.2);16 border-radius: 50%;17}18
19.joystick-outline {20 width: 100%;21 height: 100%;22}23
24.joystick-handle-container {25 position: absolute;26 top: 0;27 left: 0;28 right: 0;29 bottom: 0;30}31
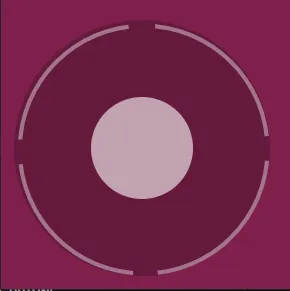
32.joystick-handle {33 position: absolute;34 width: 8vmax;35 height: 8vmax;36 border-radius: 50%;37 background-color: rgba(255, 255, 255, 0.6);38 top: 50%;39 left: 50%;40 margin-left: -4vmax;41 margin-top: -4vmax;42}With this, we’ll get the following look to our joystick
Interacting with the joystick
Testing our solution
Since the virtual joystick is intended to be used in a mobile game with touches we first need to simulate an enviroment to test our UI. To do this, we can set the following in the Player.bat file:
1--input touchAnd so our .bat file the command will look like this:
1start "Player" /d "%wd%" "..\Player\Player.exe" --player "--url=coui://uiresources/Internal/DragAndDrop/drag-n-drop.html" --input touchAdding the touch logic
The first thing we need to do is attach a listener for the touchStart event.
1const joyStickHandle = document.querySelector(".joystick-handle");2const joyStickContainer = document.querySelector(".joystick");3
4joyStickContainer.addEventListener("touchstart", handleJoystickStart);5
6function handleJoystickStart(event) {}
Then since we’ll be dragging our finger to move the joystick we’ll need to add event listeners for the touchmove and touchend events.
As we want to keep the touchmove event going even after leaving the joystick container we’ll add these events to the document and we’ll attach them on touch start so that they don’t intefere with other touch events.
1function handleJoystickStart(event) {2  document.addEventListener("touchmove", handleJoystickMove);3  document.addEventListener("touchend", handleJoystickEnd);4}5
6function handleJoystickMove(event) {}7
8function handleJoystickEnd() {9  document.removeEventListener("touchmove", handleJoystickMove);10  document.removeEventListener("touchend", handleJoystickEnd);11}
Calculating the correct position of the joystick handle
Next we need to move the handle itself.
For our current case there are two approaches we can take:
- Move the handle on both X and Y axis and restrict it to the circle
- Rotate the handle then move it only on the Y axis
In this tutorial we’ll do approach 2, because it’s much easier to actually restrict the handle going only on a single axis, we can later map the directions much easier because of the angle of rotation and finally we have the added benefit of being able to easily provide the distance between the center and the handle.
To do this, we first need to calculate the angle between the center of the joystick and the center of the handle.
What we want to achieve is to have a polar coordinate system with the center of the joystick to be the center of the FileSystem.
We can do that by utilizing the built-in JavaScript Math.atan2 function. This function calculates the angle between the 0,0 coordinate and the passed y and x GeolocationCoordinates.
In our case the 0,0 point should be the center of the joystick instead of the top left of our viewport. This is why we’ll make a util function called calculateAngle
1function calculateAngle(centerX, centerY, pointX, pointY) {2 const deltaX = pointX - centerX;3 const deltaY = pointY - centerY;4 const angleInRadians = Math.atan2(deltaY, deltaX);5 let angleInDegrees = (angleInRadians * 180) / Math.PI + 90;6 if (angleInDegrees < 0) angleInDegrees += 360;7 return angleInDegrees;8}Here we create a deltaX and deltaY constants so that we can simulate the 0,0 point as the center of our joystick.
The atan2 function will return our angle in radians so we need to convert it to degrees. Here we also add additional 90 degrees to our angle as the polar coordinate system 0 degree angle is to the left of the center, however in CSS the rotation 0 degrees angle starts from the top of the center._createMdxContent
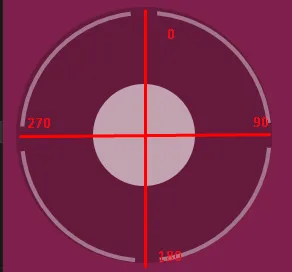
Finally we check if the angle in degrees is less than 0 and we add 360 to it, so it will be positive.
What we are now left with is a coordinate system like this:
Moving the handle
To move the handle we’ll first need to calculate the angle using the util function we’ve previously made. This is why we’ll make a new function that we can pass the touch coordinates to and calculate based on the dimensions and position of the joystick._createMdxContent
1function calculateCircleAngleAndDistance(clientX, clientY) {2  const { x, y, width, height } = joyStickContainer.getBoundingClientRect();3
4  let distance = Math.sqrt(5    Math.pow(clientX - (x + width / 2), 2) +6      Math.pow(clientY - (y + height / 2), 2)7  );8
9  distance = clamp(distance, 0, height / 2);10
11  return {12    angle: calculateAngle(x + width / 2, y + height / 2, clientX, clientY),13    distance,14  };15}
We get the x and y position of the joystick along with it’s width and height. Then we calculate the distance between the touch point and the center.
We’ve also restricted the distance between the handle and the center so that it doesn’t go past the bounds of the joystick using another util function:
1function clamp(value, min, max) {2 return Math.min(Math.max(value, min), max);3}Finally we use the calculateAngle function to get the angle in degrees and we return it along with the distance
Then we use this function to get the distance and angle so that when we touch the joystick the handle will move
1function handleJoystickMove(event) {2  const { angle, distance } = calculateCircleAngleAndDistance(3    event.touches[0].clientX,4    event.touches[0].clientY5  );6
7  joyStickHandle.style.transform = `translateY(${-distance}px)`;8  joyStickHandle.parentElement.style.transform = `rotate(${angle}deg)`;9}
We use event.touches[0] to get the first touch as there may be multiple touches to the joystick.
We also need to do call the handleJoystickMove function in the touchstart event so that when we touch the joystick the handle will move immediately.
1function handleJoystickStart(event) {2  handleJoystickMove(event);3
4  document.addEventListener("touchmove", handleJoystickMove);5  document.addEventListener("touchend", handleJoystickEnd);6}
Returning the joystick to the initial position
Physical joysticks have springs that allow the handle to return to the center when let go, we can do the same by removing the style in touchend event:
1function handleJoystickEnd() {2 joyStickHandle.style.transform = "";3 joyStickHandle.parentElement.style.transform = "";4 document.removeEventListener("touchmove", handleJoystickMove);5 document.removeEventListener("touchend", handleJoystickEnd);6}In conclusion
Creating a virtual joystick for mobile games can significantly enhance the user experience by providing intuitive and responsive controls. By following the steps outlined in this tutorial, you should now have a solid understanding of how to implement a virtual joystick in your game. Whether you’re a seasoned developer or just starting, mastering this technique will add a valuable skill to your game development toolkit. Happy coding, and may your games be ever more engaging!