Creating interactive game level selection menu
11/1/2024
Martin Bozhilov
Learn how to create interactive game level selection menu cards. Hovering over any card triggers a video preview of that level, providing players with a dynamic and immersive glimpse of the environment before they dive in.
Overview
In this tutorial, we’ll guide you through implementing a game-level selection menu with interactive videos, allowing them to play as animations when players interact with them.
We will use Unreal’s built-in Bink Video plugin for seamless video integration with the
Live Views feature of Gameface.
This setup ensures smooth playback directly from Unreal Engine, creating a visually engaging experience for your players.
Resources
The videos for this UI were taken from Freepik .
List of videos:
Getting started - Unreal Engine
We’ll begin by setting up the project in Unreal Engine. Use the getting started guide from our documentation to install the Gameface plugin and integrate it into an existing project or use the sample project created by the installer.
Once that’s complete, create a new blank map in Unreal Engine to start configuring your setup.
Setting up the Bink videos
First, we need to convert the video files we wish to use into Bink format.
You can follow the official guide in the UE documentation
for step-by-step instructions on setting up your videos.
Important: Make sure to place your videos in the Content/Movies directory within your Unreal Engine project folder. Unreal Engine will not recognize them if they’re stored elsewhere.
Creating the Render Targets
Next up, for the live view to work we need to create a TextureRenderTarget2D texture for each of our videos and save it in an accessible location within the project files.
In our case, we made a separate folder called Render Targets placed in the Blueprints folder and placed the Render Targets there.

After that we have to set the dimension of each Render Target to match the resolution of our videos. In our case that is 1280x720.
To set this, double-click on the Render Target file and locate the dimension settings on the right panel.

If you are just getting started with Unreal Engine or the Live views feature, you can get more aquainted with it by checking out our other
Unreal tutorials utilizing the power of Live Views or check out
our documentation to read more about them.
Creating the HUD class
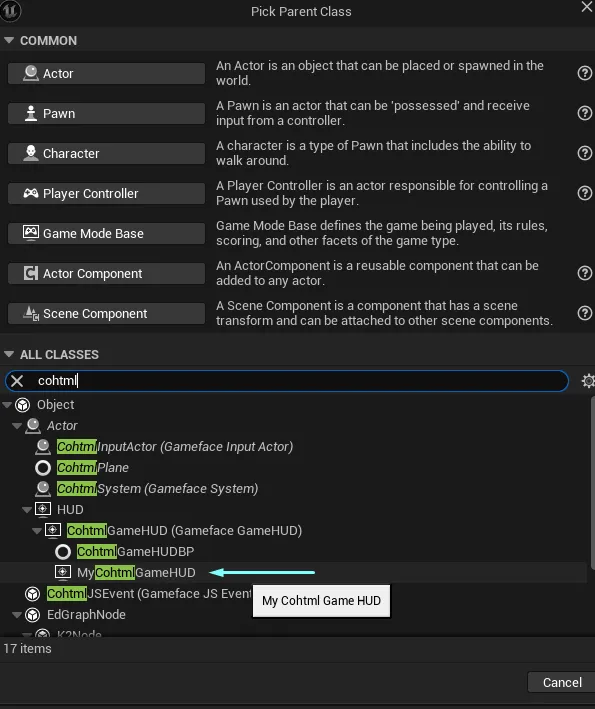
To define a custom event with parameters, we need to create a C++ class that extends the CohtmlGameHUD class provided by the Gameface plugin.
This custom C++ class will then be used as the HUD class type for our Blueprint HUD class.
We will follow the UI Scripting with C++ guide to define the custom event and make it accessible in our Blueprints. The event will take a single argument — the index of each video as we loop through them.
Start by creating the header file as follows:
1#pragma once2
3#include "CoreMinimal.h"4#include "CohtmlGameHUD.h"5#include "MyCohtmlGameHUD.generated.h"6
7UCLASS()8class AMyCohtmlGameHUD : public ACohtmlGameHUD9{10  GENERATED_BODY()11
12  public:13    virtual void BeginPlay() override;14    UFUNCTION(BlueprintImplementableEvent, BlueprintCallable, Category = Gameplay)15    void TogglePlay(const int index);16  private:17    UFUNCTION()18    void BindUI();19};
In this header file, we define the handler that will execute when the JavaScript event TogglePlay is triggered.
Now, let’s implement this in the C++ source file:
1#include "MyCohtmlGameHUD.h"2#include <CohtmlHUD.h>3
4void AMyCohtmlGameHUD::BeginPlay()5{6  Super::BeginPlay();7  GetCohtmlHUD()->ReadyForBindings.AddDynamic(this, &AMyCohtmlGameHUD::BindUI);8}9void AMyCohtmlGameHUD::BindUI()10{11  GetCohtmlHUD()->GetView()->RegisterForEvent("TogglePlay", cohtml::MakeHandler(this, &AMyCohtmlGameHUD::TogglePlay));12}
In the BindUI method, we register the TogglePlay event, which will be triggered from the frontend whenever we want to control video playback.
Once you’ve created and compiled this class, you can set up your HUD Blueprint class.
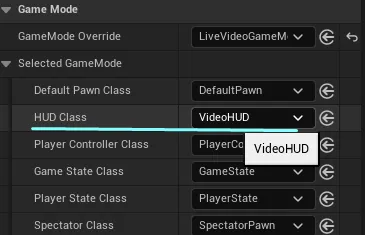
Assign this newly created HUD class as the active HUD in your map’s World Settings. This setup enables the HTML to display as the UI for your game.
Setting up the view and the input
If you have already integrated Gameface with Unreal Engine you can skip this section
Create a Setup Input method in the previously created BP to enable user input for the UI:

   Begin Object Class=/Script/BlueprintGraph.K2Node_FunctionEntry Name="K2Node_FunctionEntry_1" ExportPath="/Script/BlueprintGraph.K2Node_FunctionEntry'/Game/Blueprints/VideoHUD.VideoHUD:Setup Input.K2Node_FunctionEntry_1'"
   ExtraFlags=201457664
   FunctionReference=(MemberName="Setup Input")
   bIsEditable=True
   NodePosX=-1184
   NodePosY=96
   NodeGuid=629D6D2B4A444920B993BCB328DB1904
   CustomProperties Pin (PinId=EBECEB084B979D1287D39AA2F5686651,PinName="then",Direction="EGPD_Output",PinType.PinCategory="exec",PinType.PinSubCategory="",PinType.PinSubCategoryObject=None,PinType.PinSubCategoryMemberReference=(),PinType.PinValueType=(),PinType.ContainerType=None,PinType.bIsReference=False,PinType.bIsConst=False,PinType.bIsWeakPointer=False,PinType.bIsUObjectWrapper=False,PinType.bSerializeAsSinglePrecisionFloat=False,LinkedTo=(K2Node_CallFunction_179 B0C795774B68F365E7633D80F35515B5,),PersistentGuid=00000000000000000000000000000000,bHidden=False,bNotConnectable=False,bDefaultValueIsReadOnly=False,bDefaultValueIsIgnored=False,bAdvancedView=False,bOrphanedPin=False,)
End Object
Begin Object Class=/Script/BlueprintGraph.K2Node_FunctionResult Name="K2Node_FunctionResult_2" ExportPath="/Script/BlueprintGraph.K2Node_FunctionResult'/Game/Blueprints/VideoHUD.VideoHUD:Setup Input.K2Node_FunctionResult_2'"
   FunctionReference=(MemberName="Setup Input")
   bIsEditable=True
   NodePosX=1232
   NodePosY=96
   NodeGuid=70DC62F84141DA370BA1ED85FBE948D2
   CustomProperties Pin (PinId=7ABC1D3F4D5C21EB5B944CBE64C035DC,PinName="execute",PinType.PinCategory="exec",PinType.PinSubCategory="",PinType.PinSubCategoryObject=None,PinType.PinSubCategoryMemberReference=(),PinType.PinValueType=(),PinType.ContainerType=None,PinType.bIsReference=False,PinType.bIsConst=False,PinType.bIsWeakPointer=False,PinType.bIsUObjectWrapper=False,PinType.bSerializeAsSinglePrecisionFloat=False,LinkedTo=(K2Node_CallFunction_2289 F0C8E2934E3F6856E77CA49AFCA768A5,),PersistentGuid=00000000000000000000000000000000,bHidden=False,bNotConnectable=False,bDefaultValueIsReadOnly=False,bDefaultValueIsIgnored=False,bAdvancedView=False,bOrphanedPin=False,)
End Object
Begin Object Class=/Script/BlueprintGraph.K2Node_SpawnActorFromClass Name="K2Node_SpawnActorFromClass_1" ExportPath="/Script/BlueprintGraph.K2Node_SpawnActorFromClass'/Game/Blueprints/VideoHUD.VideoHUD:Setup Input.K2Node_SpawnActorFromClass_1'"
   NodePosX=80
   NodePosY=64
   AdvancedPinDisplay=Shown
   NodeGuid=F258E4A443F7E6E77667DFB064AA3D68
   CustomProperties Pin (PinId=3937017044422AD800BB9F95A03FA906,PinName="execute",PinType.PinCategory="exec",PinType.PinSubCategory="",PinType.PinSubCategoryObject=None,PinType.PinSubCategoryMemberReference=(),PinType.PinValueType=(),PinType.ContainerType=None,PinType.bIsReference=False,PinType.bIsConst=False,PinType.bIsWeakPointer=False,PinType.bIsUObjectWrapper=False,PinType.bSerializeAsSinglePrecisionFloat=False,LinkedTo=(K2Node_IfThenElse_0 A633E47B4BC635273ECB23A49C75B7CA,),PersistentGuid=00000000000000000000000000000000,bHidden=False,bNotConnectable=False,bDefaultValueIsReadOnly=False,bDefaultValueIsIgnored=False,bAdvancedView=False,bOrphanedPin=False,)
   CustomProperties Pin (PinId=F74539164921012AC12C8294AFAC24FD,PinName="then",Direction="EGPD_Output",PinType.PinCategory="exec",PinType.PinSubCategory="",PinType.PinSubCategoryObject=None,PinType.PinSubCategoryMemberReference=(),PinType.PinValueType=(),PinType.ContainerType=None,PinType.bIsReference=False,PinType.bIsConst=False,PinType.bIsWeakPointer=False,PinType.bIsUObjectWrapper=False,PinType.bSerializeAsSinglePrecisionFloat=False,LinkedTo=(K2Node_CallFunction_2288 B67A9C764A1DD3559ADE5E81091F1DE0,),PersistentGuid=00000000000000000000000000000000,bHidden=False,bNotConnectable=False,bDefaultValueIsReadOnly=False,bDefaultValueIsIgnored=False,bAdvancedView=False,bOrphanedPin=False,)
   CustomProperties Pin (PinId=C1BE9038465BAE3345C71CAC60A8DA5D,PinName="Class",PinToolTip="Actor Class Reference Class
The object class you want to construct",PinType.PinCategory="class",PinType.PinSubCategory="",PinType.PinSubCategoryObject="/Script/CoreUObject.Class'/Script/Engine.Actor'",PinType.PinSubCategoryMemberReference=(),PinType.PinValueType=(),PinType.ContainerType=None,PinType.bIsReference=False,PinType.bIsConst=False,PinType.bIsWeakPointer=False,PinType.bIsUObjectWrapper=False,PinType.bSerializeAsSinglePrecisionFloat=False,DefaultObject="/Script/CohtmlPlugin.CohtmlInputActor",PersistentGuid=00000000000000000000000000000000,bHidden=False,bNotConnectable=False,bDefaultValueIsReadOnly=False,bDefaultValueIsIgnored=False,bAdvancedView=False,bOrphanedPin=False,)
   CustomProperties Pin (PinId=22C887FC43B0B1ABD9F78F9CD35C7424,PinName="ReturnValue",PinToolTip="Gameface Input Actor Object Reference Return Value
The constructed object",Direction="EGPD_Output",PinType.PinCategory="object",PinType.PinSubCategory="",PinType.PinSubCategoryObject="/Script/CoreUObject.Class'/Script/CohtmlPlugin.CohtmlInputActor'",PinType.PinSubCategoryMemberReference=(),PinType.PinValueType=(),PinType.ContainerType=None,PinType.bIsReference=False,PinType.bIsConst=False,PinType.bIsWeakPointer=False,PinType.bIsUObjectWrapper=False,PinType.bSerializeAsSinglePrecisionFloat=False,LinkedTo=(K2Node_CallFunction_2288 2C48E2AE4146EED83587E49B527BF508,K2Node_CallFunction_2289 C93791264A8B7A549EDCB7975D319127,),PersistentGuid=00000000000000000000000000000000,bHidden=False,bNotConnectable=False,bDefaultValueIsReadOnly=False,bDefaultValueIsIgnored=False,bAdvancedView=False,bOrphanedPin=False,)
   CustomProperties Pin (PinId=A617EF8A4E76762AE40281A35048E509,PinName="SpawnTransform",PinToolTip="Spawn Transform
Transform

The transform to spawn the Actor with",PinType.PinCategory="struct",PinType.PinSubCategory="",PinType.PinSubCategoryObject="/Script/CoreUObject.ScriptStruct'/Script/CoreUObject.Transform'",PinType.PinSubCategoryMemberReference=(),PinType.PinValueType=(),PinType.ContainerType=None,PinType.bIsReference=False,PinType.bIsConst=False,PinType.bIsWeakPointer=False,PinType.bIsUObjectWrapper=False,PinType.bSerializeAsSinglePrecisionFloat=False,LinkedTo=(K2Node_CallFunction_9557 F29D151141F2715498220291A5ABE9E4,),PersistentGuid=00000000000000000000000000000000,bHidden=False,bNotConnectable=False,bDefaultValueIsReadOnly=False,bDefaultValueIsIgnored=False,bAdvancedView=False,bOrphanedPin=False,)
   CustomProperties Pin (PinId=D4D1F6AE4B2E77C1AFAB5996002E9E58,PinName="CollisionHandlingOverride",PinToolTip="Collision Handling Override
ESpawnActorCollisionHandlingMethod Enum

Specifies how to handle collisions at the spawn point. If undefined, uses actor class settings.",PinType.PinCategory="byte",PinType.PinSubCategory="",PinType.PinSubCategoryObject="/Script/CoreUObject.Enum'/Script/Engine.ESpawnActorCollisionHandlingMethod'",PinType.PinSubCategoryMemberReference=(),PinType.PinValueType=(),PinType.ContainerType=None,PinType.bIsReference=False,PinType.bIsConst=False,PinType.bIsWeakPointer=False,PinType.bIsUObjectWrapper=False,PinType.bSerializeAsSinglePrecisionFloat=False,DefaultValue="AdjustIfPossibleButDontSpawnIfColliding",PersistentGuid=00000000000000000000000000000000,bHidden=False,bNotConnectable=False,bDefaultValueIsReadOnly=False,bDefaultValueIsIgnored=False,bAdvancedView=False,bOrphanedPin=False,)
   CustomProperties Pin (PinId=72F601E0403F9C88B77014B036C09779,PinName="TransformScaleMethod",PinType.PinCategory="byte",PinType.PinSubCategory="",PinType.PinSubCategoryObject="/Script/CoreUObject.Enum'/Script/Engine.ESpawnActorScaleMethod'",PinType.PinSubCategoryMemberReference=(),PinType.PinValueType=(),PinType.ContainerType=None,PinType.bIsReference=False,PinType.bIsConst=False,PinType.bIsWeakPointer=False,PinType.bIsUObjectWrapper=False,PinType.bSerializeAsSinglePrecisionFloat=False,DefaultValue="OverrideRootScale",PersistentGuid=00000000000000000000000000000000,bHidden=False,bNotConnectable=False,bDefaultValueIsReadOnly=False,bDefaultValueIsIgnored=False,bAdvancedView=True,bOrphanedPin=False,)
   CustomProperties Pin (PinId=49BBC6754F6007E3C718A8818CEEA804,PinName="Owner",PinToolTip="Owner
Actor Object Reference

Can be left empty; primarily used for replication (bNetUseOwnerRelevancy and bOnlyRelevantToOwner), or visibility (PrimitiveComponent's bOwnerNoSee/bOnlyOwnerSee)",PinType.PinCategory="object",PinType.PinSubCategory="",PinType.PinSubCategoryObject="/Script/CoreUObject.Class'/Script/Engine.Actor'",PinType.PinSubCategoryMemberReference=(),PinType.PinValueType=(),PinType.ContainerType=None,PinType.bIsReference=False,PinType.bIsConst=False,PinType.bIsWeakPointer=False,PinType.bIsUObjectWrapper=False,PinType.bSerializeAsSinglePrecisionFloat=False,PersistentGuid=00000000000000000000000000000000,bHidden=False,bNotConnectable=False,bDefaultValueIsReadOnly=False,bDefaultValueIsIgnored=False,bAdvancedView=True,bOrphanedPin=False,)
   CustomProperties Pin (PinId=A6CCD3914E3B1268879CC8882A6B5BD9,PinName="Instigator",PinToolTip="Instigator
Pawn Object Reference

Pawn responsible for damage and other gameplay events caused by this actor.",PinType.PinCategory="object",PinType.PinSubCategory="",PinType.PinSubCategoryObject="/Script/CoreUObject.Class'/Script/Engine.Pawn'",PinType.PinSubCategoryMemberReference=(),PinType.PinValueType=(),PinType.ContainerType=None,PinType.bIsReference=False,PinType.bIsConst=False,PinType.bIsWeakPointer=False,PinType.bIsUObjectWrapper=True,PinType.bSerializeAsSinglePrecisionFloat=False,AutogeneratedDefaultValue="None",PersistentGuid=00000000000000000000000000000000,bHidden=False,bNotConnectable=False,bDefaultValueIsReadOnly=False,bDefaultValueIsIgnored=False,bAdvancedView=False,bOrphanedPin=False,)
End Object
Begin Object Class=/Script/BlueprintGraph.K2Node_CallFunction Name="K2Node_CallFunction_9557" ExportPath="/Script/BlueprintGraph.K2Node_CallFunction'/Game/Blueprints/VideoHUD.VideoHUD:Setup Input.K2Node_CallFunction_9557'"
   bIsPureFunc=True
   FunctionReference=(MemberParent="/Script/CoreUObject.Class'/Script/Engine.KismetMathLibrary'",MemberName="MakeTransform")
   NodePosX=-272
   NodePosY=240
   NodeGuid=76C4BDD2434ADD4595A530ADBABD021A
   CustomProperties Pin (PinId=C57B14DE43DC3F29DC0AF0BB4BC91EFE,PinName="self",PinFriendlyName=NSLOCTEXT("K2Node", "Target", "Target"),PinType.PinCategory="object",PinType.PinSubCategory="",PinType.PinSubCategoryObject="/Script/CoreUObject.Class'/Script/Engine.KismetMathLibrary'",PinType.PinSubCategoryMemberReference=(),PinType.PinValueType=(),PinType.ContainerType=None,PinType.bIsReference=False,PinType.bIsConst=False,PinType.bIsWeakPointer=False,PinType.bIsUObjectWrapper=False,PinType.bSerializeAsSinglePrecisionFloat=False,DefaultObject="/Script/Engine.Default__KismetMathLibrary",PersistentGuid=00000000000000000000000000000000,bHidden=True,bNotConnectable=False,bDefaultValueIsReadOnly=False,bDefaultValueIsIgnored=False,bAdvancedView=False,bOrphanedPin=False,)
   CustomProperties Pin (PinId=6537860F4B472D6FFCAF8B8337A16F12,PinName="Location",PinType.PinCategory="struct",PinType.PinSubCategory="",PinType.PinSubCategoryObject="/Script/CoreUObject.ScriptStruct'/Script/CoreUObject.Vector'",PinType.PinSubCategoryMemberReference=(),PinType.PinValueType=(),PinType.ContainerType=None,PinType.bIsReference=False,PinType.bIsConst=False,PinType.bIsWeakPointer=False,PinType.bIsUObjectWrapper=False,PinType.bSerializeAsSinglePrecisionFloat=False,DefaultValue="0, 0, 0",AutogeneratedDefaultValue="0, 0, 0",PersistentGuid=00000000000000000000000000000000,bHidden=False,bNotConnectable=False,bDefaultValueIsReadOnly=False,bDefaultValueIsIgnored=False,bAdvancedView=False,bOrphanedPin=False,)
   CustomProperties Pin (PinId=6854467B4AB70F62E4AD83B405A2314E,PinName="Rotation",PinType.PinCategory="struct",PinType.PinSubCategory="",PinType.PinSubCategoryObject="/Script/CoreUObject.ScriptStruct'/Script/CoreUObject.Rotator'",PinType.PinSubCategoryMemberReference=(),PinType.PinValueType=(),PinType.ContainerType=None,PinType.bIsReference=False,PinType.bIsConst=False,PinType.bIsWeakPointer=False,PinType.bIsUObjectWrapper=False,PinType.bSerializeAsSinglePrecisionFloat=False,DefaultValue="0, 0, 0",AutogeneratedDefaultValue="0, 0, 0",PersistentGuid=00000000000000000000000000000000,bHidden=False,bNotConnectable=False,bDefaultValueIsReadOnly=False,bDefaultValueIsIgnored=False,bAdvancedView=False,bOrphanedPin=False,)
   CustomProperties Pin (PinId=8DB416E74C75943E9F120FABF150D66C,PinName="Scale",PinType.PinCategory="struct",PinType.PinSubCategory="",PinType.PinSubCategoryObject="/Script/CoreUObject.ScriptStruct'/Script/CoreUObject.Vector'",PinType.PinSubCategoryMemberReference=(),PinType.PinValueType=(),PinType.ContainerType=None,PinType.bIsReference=False,PinType.bIsConst=False,PinType.bIsWeakPointer=False,PinType.bIsUObjectWrapper=False,PinType.bSerializeAsSinglePrecisionFloat=False,DefaultValue="1.000000,1.000000,1.000000",AutogeneratedDefaultValue="1.000000,1.000000,1.000000",PersistentGuid=00000000000000000000000000000000,bHidden=False,bNotConnectable=False,bDefaultValueIsReadOnly=False,bDefaultValueIsIgnored=False,bAdvancedView=False,bOrphanedPin=False,)
   CustomProperties Pin (PinId=F29D151141F2715498220291A5ABE9E4,PinName="ReturnValue",Direction="EGPD_Output",PinType.PinCategory="struct",PinType.PinSubCategory="",PinType.PinSubCategoryObject="/Script/CoreUObject.ScriptStruct'/Script/CoreUObject.Transform'",PinType.PinSubCategoryMemberReference=(),PinType.PinValueType=(),PinType.ContainerType=None,PinType.bIsReference=False,PinType.bIsConst=False,PinType.bIsWeakPointer=False,PinType.bIsUObjectWrapper=False,PinType.bSerializeAsSinglePrecisionFloat=False,LinkedTo=(K2Node_SpawnActorFromClass_1 A617EF8A4E76762AE40281A35048E509,),PersistentGuid=00000000000000000000000000000000,bHidden=False,bNotConnectable=False,bDefaultValueIsReadOnly=False,bDefaultValueIsIgnored=False,bAdvancedView=False,bOrphanedPin=False,)
End Object
Begin Object Class=/Script/BlueprintGraph.K2Node_CallFunction Name="K2Node_CallFunction_2288" ExportPath="/Script/BlueprintGraph.K2Node_CallFunction'/Game/Blueprints/VideoHUD.VideoHUD:Setup Input.K2Node_CallFunction_2288'"
   FunctionReference=(MemberParent="/Script/CoreUObject.Class'/Script/CohtmlPlugin.CohtmlInputActor'",MemberName="Initialize")
   NodePosX=624
   NodePosY=16
   NodeGuid=D6CD612E47C8F4250564BCA24859F9F9
   CustomProperties Pin (PinId=B67A9C764A1DD3559ADE5E81091F1DE0,PinName="execute",PinType.PinCategory="exec",PinType.PinSubCategory="",PinType.PinSubCategoryObject=None,PinType.PinSubCategoryMemberReference=(),PinType.PinValueType=(),PinType.ContainerType=None,PinType.bIsReference=False,PinType.bIsConst=False,PinType.bIsWeakPointer=False,PinType.bIsUObjectWrapper=False,PinType.bSerializeAsSinglePrecisionFloat=False,LinkedTo=(K2Node_SpawnActorFromClass_1 F74539164921012AC12C8294AFAC24FD,),PersistentGuid=00000000000000000000000000000000,bHidden=False,bNotConnectable=False,bDefaultValueIsReadOnly=False,bDefaultValueIsIgnored=False,bAdvancedView=False,bOrphanedPin=False,)
   CustomProperties Pin (PinId=736186BB49056928D94484BCF108BBC5,PinName="then",Direction="EGPD_Output",PinType.PinCategory="exec",PinType.PinSubCategory="",PinType.PinSubCategoryObject=None,PinType.PinSubCategoryMemberReference=(),PinType.PinValueType=(),PinType.ContainerType=None,PinType.bIsReference=False,PinType.bIsConst=False,PinType.bIsWeakPointer=False,PinType.bIsUObjectWrapper=False,PinType.bSerializeAsSinglePrecisionFloat=False,LinkedTo=(K2Node_CallFunction_2289 B97CDC324E58A1E7524C52BF9E4768CA,),PersistentGuid=00000000000000000000000000000000,bHidden=False,bNotConnectable=False,bDefaultValueIsReadOnly=False,bDefaultValueIsIgnored=False,bAdvancedView=False,bOrphanedPin=False,)
   CustomProperties Pin (PinId=2C48E2AE4146EED83587E49B527BF508,PinName="self",PinFriendlyName=NSLOCTEXT("K2Node", "Target", "Target"),PinType.PinCategory="object",PinType.PinSubCategory="",PinType.PinSubCategoryObject="/Script/CoreUObject.Class'/Script/CohtmlPlugin.CohtmlInputActor'",PinType.PinSubCategoryMemberReference=(),PinType.PinValueType=(),PinType.ContainerType=None,PinType.bIsReference=False,PinType.bIsConst=False,PinType.bIsWeakPointer=False,PinType.bIsUObjectWrapper=False,PinType.bSerializeAsSinglePrecisionFloat=False,LinkedTo=(K2Node_SpawnActorFromClass_1 22C887FC43B0B1ABD9F78F9CD35C7424,),PersistentGuid=00000000000000000000000000000000,bHidden=False,bNotConnectable=False,bDefaultValueIsReadOnly=False,bDefaultValueIsIgnored=False,bAdvancedView=False,bOrphanedPin=False,)
   CustomProperties Pin (PinId=0411CFA24513047BB481CDB8BC5AB1BF,PinName="CollisionChannel",PinType.PinCategory="byte",PinType.PinSubCategory="",PinType.PinSubCategoryObject="/Script/CoreUObject.Enum'/Script/Engine.ECollisionChannel'",PinType.PinSubCategoryMemberReference=(),PinType.PinValueType=(),PinType.ContainerType=None,PinType.bIsReference=False,PinType.bIsConst=False,PinType.bIsWeakPointer=False,PinType.bIsUObjectWrapper=False,PinType.bSerializeAsSinglePrecisionFloat=False,DefaultValue="ECC_WorldDynamic",AutogeneratedDefaultValue="ECC_WorldDynamic",PersistentGuid=00000000000000000000000000000000,bHidden=False,bNotConnectable=False,bDefaultValueIsReadOnly=False,bDefaultValueIsIgnored=False,bAdvancedView=False,bOrphanedPin=False,)
   CustomProperties Pin (PinId=205BCF894E7642DDCAFC5EA9306217B5,PinName="AddressMode",PinType.PinCategory="byte",PinType.PinSubCategory="",PinType.PinSubCategoryObject="/Script/CoreUObject.Enum'/Script/Engine.TextureAddress'",PinType.PinSubCategoryMemberReference=(),PinType.PinValueType=(),PinType.ContainerType=None,PinType.bIsReference=False,PinType.bIsConst=False,PinType.bIsWeakPointer=False,PinType.bIsUObjectWrapper=False,PinType.bSerializeAsSinglePrecisionFloat=False,DefaultValue="TA_Wrap",AutogeneratedDefaultValue="TA_Wrap",PersistentGuid=00000000000000000000000000000000,bHidden=False,bNotConnectable=False,bDefaultValueIsReadOnly=False,bDefaultValueIsIgnored=False,bAdvancedView=False,bOrphanedPin=False,)
   CustomProperties Pin (PinId=3EBB8CEA46A9EAEDD4BF228007C1AD9B,PinName="RaycastQuality",PinType.PinCategory="byte",PinType.PinSubCategory="",PinType.PinSubCategoryObject="/Script/CoreUObject.Enum'/Script/CohtmlPlugin.ECohtmlInputWidgetRaycastQuality'",PinType.PinSubCategoryMemberReference=(),PinType.PinValueType=(),PinType.ContainerType=None,PinType.bIsReference=False,PinType.bIsConst=False,PinType.bIsWeakPointer=False,PinType.bIsUObjectWrapper=False,PinType.bSerializeAsSinglePrecisionFloat=False,DefaultValue="CohtmlRaycastQuality_Accurate",AutogeneratedDefaultValue="CohtmlRaycastQuality_Accurate",PersistentGuid=00000000000000000000000000000000,bHidden=False,bNotConnectable=False,bDefaultValueIsReadOnly=False,bDefaultValueIsIgnored=False,bAdvancedView=False,bOrphanedPin=False,)
   CustomProperties Pin (PinId=D02EF8014625FCEAF4274CA3BC408573,PinName="UVChannel",PinType.PinCategory="int",PinType.PinSubCategory="",PinType.PinSubCategoryObject=None,PinType.PinSubCategoryMemberReference=(),PinType.PinValueType=(),PinType.ContainerType=None,PinType.bIsReference=False,PinType.bIsConst=False,PinType.bIsWeakPointer=False,PinType.bIsUObjectWrapper=False,PinType.bSerializeAsSinglePrecisionFloat=False,DefaultValue="0",AutogeneratedDefaultValue="0",PersistentGuid=00000000000000000000000000000000,bHidden=False,bNotConnectable=False,bDefaultValueIsReadOnly=False,bDefaultValueIsIgnored=False,bAdvancedView=False,bOrphanedPin=False,)
End Object
Begin Object Class=/Script/BlueprintGraph.K2Node_CallFunction Name="K2Node_CallFunction_2289" ExportPath="/Script/BlueprintGraph.K2Node_CallFunction'/Game/Blueprints/VideoHUD.VideoHUD:Setup Input.K2Node_CallFunction_2289'"
   FunctionReference=(MemberParent="/Script/CoreUObject.Class'/Script/CohtmlPlugin.CohtmlInputActor'",MemberName="AlwaysAcceptMouseInput")
   NodePosX=928
   NodePosY=96
   NodeGuid=B33EDD3644F56A333A5950B1E985D659
   CustomProperties Pin (PinId=B97CDC324E58A1E7524C52BF9E4768CA,PinName="execute",PinType.PinCategory="exec",PinType.PinSubCategory="",PinType.PinSubCategoryObject=None,PinType.PinSubCategoryMemberReference=(),PinType.PinValueType=(),PinType.ContainerType=None,PinType.bIsReference=False,PinType.bIsConst=False,PinType.bIsWeakPointer=False,PinType.bIsUObjectWrapper=False,PinType.bSerializeAsSinglePrecisionFloat=False,LinkedTo=(K2Node_CallFunction_2288 736186BB49056928D94484BCF108BBC5,),PersistentGuid=00000000000000000000000000000000,bHidden=False,bNotConnectable=False,bDefaultValueIsReadOnly=False,bDefaultValueIsIgnored=False,bAdvancedView=False,bOrphanedPin=False,)
   CustomProperties Pin (PinId=F0C8E2934E3F6856E77CA49AFCA768A5,PinName="then",Direction="EGPD_Output",PinType.PinCategory="exec",PinType.PinSubCategory="",PinType.PinSubCategoryObject=None,PinType.PinSubCategoryMemberReference=(),PinType.PinValueType=(),PinType.ContainerType=None,PinType.bIsReference=False,PinType.bIsConst=False,PinType.bIsWeakPointer=False,PinType.bIsUObjectWrapper=False,PinType.bSerializeAsSinglePrecisionFloat=False,LinkedTo=(K2Node_FunctionResult_2 7ABC1D3F4D5C21EB5B944CBE64C035DC,),PersistentGuid=00000000000000000000000000000000,bHidden=False,bNotConnectable=False,bDefaultValueIsReadOnly=False,bDefaultValueIsIgnored=False,bAdvancedView=False,bOrphanedPin=False,)
   CustomProperties Pin (PinId=C93791264A8B7A549EDCB7975D319127,PinName="self",PinFriendlyName=NSLOCTEXT("K2Node", "Target", "Target"),PinType.PinCategory="object",PinType.PinSubCategory="",PinType.PinSubCategoryObject="/Script/CoreUObject.Class'/Script/CohtmlPlugin.CohtmlInputActor'",PinType.PinSubCategoryMemberReference=(),PinType.PinValueType=(),PinType.ContainerType=None,PinType.bIsReference=False,PinType.bIsConst=False,PinType.bIsWeakPointer=False,PinType.bIsUObjectWrapper=False,PinType.bSerializeAsSinglePrecisionFloat=False,LinkedTo=(K2Node_SpawnActorFromClass_1 22C887FC43B0B1ABD9F78F9CD35C7424,),PersistentGuid=00000000000000000000000000000000,bHidden=False,bNotConnectable=False,bDefaultValueIsReadOnly=False,bDefaultValueIsIgnored=False,bAdvancedView=False,bOrphanedPin=False,)
   CustomProperties Pin (PinId=282A095D4FFB249A757CE29C7CA2B5EB,PinName="bAccept",PinType.PinCategory="bool",PinType.PinSubCategory="",PinType.PinSubCategoryObject=None,PinType.PinSubCategoryMemberReference=(),PinType.PinValueType=(),PinType.ContainerType=None,PinType.bIsReference=False,PinType.bIsConst=False,PinType.bIsWeakPointer=False,PinType.bIsUObjectWrapper=False,PinType.bSerializeAsSinglePrecisionFloat=False,DefaultValue="true",AutogeneratedDefaultValue="false",PersistentGuid=00000000000000000000000000000000,bHidden=False,bNotConnectable=False,bDefaultValueIsReadOnly=False,bDefaultValueIsIgnored=False,bAdvancedView=False,bOrphanedPin=False,)
End Object
Begin Object Class=/Script/BlueprintGraph.K2Node_CallFunction Name="K2Node_CallFunction_179" ExportPath="/Script/BlueprintGraph.K2Node_CallFunction'/Game/Blueprints/VideoHUD.VideoHUD:Setup Input.K2Node_CallFunction_179'"
   FunctionReference=(MemberParent="/Script/CoreUObject.Class'/Script/Engine.GameplayStatics'",MemberName="GetAllActorsOfClass")
   NodePosX=-928
   NodePosY=64
   NodeGuid=7CD0B4F54382BAB3AD13EE8AAEE398CC
   CustomProperties Pin (PinId=B0C795774B68F365E7633D80F35515B5,PinName="execute",PinToolTip="
Exec",PinType.PinCategory="exec",PinType.PinSubCategory="",PinType.PinSubCategoryObject=None,PinType.PinSubCategoryMemberReference=(),PinType.PinValueType=(),PinType.ContainerType=None,PinType.bIsReference=False,PinType.bIsConst=False,PinType.bIsWeakPointer=False,PinType.bIsUObjectWrapper=False,PinType.bSerializeAsSinglePrecisionFloat=False,LinkedTo=(K2Node_FunctionEntry_1 EBECEB084B979D1287D39AA2F5686651,),PersistentGuid=00000000000000000000000000000000,bHidden=False,bNotConnectable=False,bDefaultValueIsReadOnly=False,bDefaultValueIsIgnored=False,bAdvancedView=False,bOrphanedPin=False,)
   CustomProperties Pin (PinId=160A6BAB416446FF9CFC838762B58A92,PinName="then",PinToolTip="
Exec",Direction="EGPD_Output",PinType.PinCategory="exec",PinType.PinSubCategory="",PinType.PinSubCategoryObject=None,PinType.PinSubCategoryMemberReference=(),PinType.PinValueType=(),PinType.ContainerType=None,PinType.bIsReference=False,PinType.bIsConst=False,PinType.bIsWeakPointer=False,PinType.bIsUObjectWrapper=False,PinType.bSerializeAsSinglePrecisionFloat=False,LinkedTo=(K2Node_IfThenElse_0 B6DE4CB446216B44F9FB8ABD22161340,),PersistentGuid=00000000000000000000000000000000,bHidden=False,bNotConnectable=False,bDefaultValueIsReadOnly=False,bDefaultValueIsIgnored=False,bAdvancedView=False,bOrphanedPin=False,)
   CustomProperties Pin (PinId=7428CCCB4A27214A0626D9B4109E1758,PinName="self",PinFriendlyName=NSLOCTEXT("K2Node", "Target", "Target"),PinToolTip="Target
Gameplay Statics Object Reference",PinType.PinCategory="object",PinType.PinSubCategory="",PinType.PinSubCategoryObject="/Script/CoreUObject.Class'/Script/Engine.GameplayStatics'",PinType.PinSubCategoryMemberReference=(),PinType.PinValueType=(),PinType.ContainerType=None,PinType.bIsReference=False,PinType.bIsConst=False,PinType.bIsWeakPointer=False,PinType.bIsUObjectWrapper=False,PinType.bSerializeAsSinglePrecisionFloat=False,DefaultObject="/Script/Engine.Default__GameplayStatics",PersistentGuid=00000000000000000000000000000000,bHidden=True,bNotConnectable=False,bDefaultValueIsReadOnly=False,bDefaultValueIsIgnored=False,bAdvancedView=False,bOrphanedPin=False,)
   CustomProperties Pin (PinId=CA3E68C64D45B792C016C0B82E7F8819,PinName="WorldContextObject",PinToolTip="World Context Object
Object Reference",PinType.PinCategory="object",PinType.PinSubCategory="",PinType.PinSubCategoryObject="/Script/CoreUObject.Class'/Script/CoreUObject.Object'",PinType.PinSubCategoryMemberReference=(),PinType.PinValueType=(),PinType.ContainerType=None,PinType.bIsReference=False,PinType.bIsConst=True,PinType.bIsWeakPointer=False,PinType.bIsUObjectWrapper=False,PinType.bSerializeAsSinglePrecisionFloat=False,PersistentGuid=00000000000000000000000000000000,bHidden=True,bNotConnectable=False,bDefaultValueIsReadOnly=False,bDefaultValueIsIgnored=False,bAdvancedView=False,bOrphanedPin=False,)
   CustomProperties Pin (PinId=3F29531B4E958422FCA6E8B7D238358C,PinName="ActorClass",PinToolTip="Actor Class
Actor Class Reference

Class of Actor to find. Must be specified or result array will be empty.",PinType.PinCategory="class",PinType.PinSubCategory="",PinType.PinSubCategoryObject="/Script/CoreUObject.Class'/Script/Engine.Actor'",PinType.PinSubCategoryMemberReference=(),PinType.PinValueType=(),PinType.ContainerType=None,PinType.bIsReference=False,PinType.bIsConst=False,PinType.bIsWeakPointer=False,PinType.bIsUObjectWrapper=True,PinType.bSerializeAsSinglePrecisionFloat=False,DefaultObject="/Script/CohtmlPlugin.CohtmlInputActor",PersistentGuid=00000000000000000000000000000000,bHidden=False,bNotConnectable=False,bDefaultValueIsReadOnly=False,bDefaultValueIsIgnored=False,bAdvancedView=False,bOrphanedPin=False,)
   CustomProperties Pin (PinId=BDAE77F94AFF590233F6C2BDDC57B577,PinName="OutActors",PinToolTip="Out Actors
Array of Gameface Input Actor Object References

Output array of Actors of the specified class.",Direction="EGPD_Output",PinType.PinCategory="object",PinType.PinSubCategory="",PinType.PinSubCategoryObject="/Script/CoreUObject.Class'/Script/CohtmlPlugin.CohtmlInputActor'",PinType.PinSubCategoryMemberReference=(),PinType.PinValueType=(),PinType.ContainerType=Array,PinType.bIsReference=False,PinType.bIsConst=False,PinType.bIsWeakPointer=False,PinType.bIsUObjectWrapper=False,PinType.bSerializeAsSinglePrecisionFloat=False,LinkedTo=(K2Node_CallArrayFunction_1 0858BF55471E5CBD35113A91D0B2E5B3,),PersistentGuid=00000000000000000000000000000000,bHidden=False,bNotConnectable=False,bDefaultValueIsReadOnly=False,bDefaultValueIsIgnored=False,bAdvancedView=False,bOrphanedPin=False,)
End Object
Begin Object Class=/Script/BlueprintGraph.K2Node_CallArrayFunction Name="K2Node_CallArrayFunction_1" ExportPath="/Script/BlueprintGraph.K2Node_CallArrayFunction'/Game/Blueprints/VideoHUD.VideoHUD:Setup Input.K2Node_CallArrayFunction_1'"
   bIsPureFunc=True
   FunctionReference=(MemberParent="/Script/CoreUObject.Class'/Script/Engine.KismetArrayLibrary'",MemberName="Array_Length")
   NodePosX=-624
   NodePosY=240
   NodeGuid=3BA9690B436BED086D54B78187CEA677
   CustomProperties Pin (PinId=8FEA8BBA45DBE4F0C046B89E2EC33BF5,PinName="self",PinFriendlyName=NSLOCTEXT("K2Node", "Target", "Target"),PinType.PinCategory="object",PinType.PinSubCategory="",PinType.PinSubCategoryObject="/Script/CoreUObject.Class'/Script/Engine.KismetArrayLibrary'",PinType.PinSubCategoryMemberReference=(),PinType.PinValueType=(),PinType.ContainerType=None,PinType.bIsReference=False,PinType.bIsConst=False,PinType.bIsWeakPointer=False,PinType.bIsUObjectWrapper=False,PinType.bSerializeAsSinglePrecisionFloat=False,DefaultObject="/Script/Engine.Default__KismetArrayLibrary",PersistentGuid=00000000000000000000000000000000,bHidden=True,bNotConnectable=False,bDefaultValueIsReadOnly=False,bDefaultValueIsIgnored=False,bAdvancedView=False,bOrphanedPin=False,)
   CustomProperties Pin (PinId=0858BF55471E5CBD35113A91D0B2E5B3,PinName="TargetArray",PinType.PinCategory="object",PinType.PinSubCategory="",PinType.PinSubCategoryObject="/Script/CoreUObject.Class'/Script/CohtmlPlugin.CohtmlInputActor'",PinType.PinSubCategoryMemberReference=(),PinType.PinValueType=(),PinType.ContainerType=Array,PinType.bIsReference=True,PinType.bIsConst=True,PinType.bIsWeakPointer=False,PinType.bIsUObjectWrapper=False,PinType.bSerializeAsSinglePrecisionFloat=False,LinkedTo=(K2Node_CallFunction_179 BDAE77F94AFF590233F6C2BDDC57B577,),PersistentGuid=00000000000000000000000000000000,bHidden=False,bNotConnectable=False,bDefaultValueIsReadOnly=False,bDefaultValueIsIgnored=True,bAdvancedView=False,bOrphanedPin=False,)
   CustomProperties Pin (PinId=04FE597E4A80DC2C3187049199DC96C6,PinName="ReturnValue",Direction="EGPD_Output",PinType.PinCategory="int",PinType.PinSubCategory="",PinType.PinSubCategoryObject=None,PinType.PinSubCategoryMemberReference=(),PinType.PinValueType=(),PinType.ContainerType=None,PinType.bIsReference=False,PinType.bIsConst=False,PinType.bIsWeakPointer=False,PinType.bIsUObjectWrapper=False,PinType.bSerializeAsSinglePrecisionFloat=False,DefaultValue="0",AutogeneratedDefaultValue="0",LinkedTo=(K2Node_CallFunction_180 FD5F5E68464482281D5EEA8BF028CAB6,),PersistentGuid=00000000000000000000000000000000,bHidden=False,bNotConnectable=False,bDefaultValueIsReadOnly=False,bDefaultValueIsIgnored=False,bAdvancedView=False,bOrphanedPin=False,)
End Object
Begin Object Class=/Script/BlueprintGraph.K2Node_CallFunction Name="K2Node_CallFunction_180" ExportPath="/Script/BlueprintGraph.K2Node_CallFunction'/Game/Blueprints/VideoHUD.VideoHUD:Setup Input.K2Node_CallFunction_180'"
   bIsPureFunc=True
   FunctionReference=(MemberParent="/Script/CoreUObject.Class'/Script/Engine.KismetMathLibrary'",MemberName="EqualEqual_IntInt")
   NodePosX=-400
   NodePosY=160
   NodeGuid=41CDE2424D5281A3A11DF98132B277B9
   CustomProperties Pin (PinId=287FA4A047A5B2317EE5D4AB65206F99,PinName="self",PinFriendlyName=NSLOCTEXT("K2Node", "Target", "Target"),PinType.PinCategory="object",PinType.PinSubCategory="",PinType.PinSubCategoryObject="/Script/CoreUObject.Class'/Script/Engine.KismetMathLibrary'",PinType.PinSubCategoryMemberReference=(),PinType.PinValueType=(),PinType.ContainerType=None,PinType.bIsReference=False,PinType.bIsConst=False,PinType.bIsWeakPointer=False,PinType.bIsUObjectWrapper=False,PinType.bSerializeAsSinglePrecisionFloat=False,DefaultObject="/Script/Engine.Default__KismetMathLibrary",PersistentGuid=00000000000000000000000000000000,bHidden=True,bNotConnectable=False,bDefaultValueIsReadOnly=False,bDefaultValueIsIgnored=False,bAdvancedView=False,bOrphanedPin=False,)
   CustomProperties Pin (PinId=FD5F5E68464482281D5EEA8BF028CAB6,PinName="A",PinType.PinCategory="int",PinType.PinSubCategory="",PinType.PinSubCategoryObject=None,PinType.PinSubCategoryMemberReference=(),PinType.PinValueType=(),PinType.ContainerType=None,PinType.bIsReference=False,PinType.bIsConst=False,PinType.bIsWeakPointer=False,PinType.bIsUObjectWrapper=False,PinType.bSerializeAsSinglePrecisionFloat=False,DefaultValue="0",AutogeneratedDefaultValue="0",LinkedTo=(K2Node_CallArrayFunction_1 04FE597E4A80DC2C3187049199DC96C6,),PersistentGuid=00000000000000000000000000000000,bHidden=False,bNotConnectable=False,bDefaultValueIsReadOnly=False,bDefaultValueIsIgnored=False,bAdvancedView=False,bOrphanedPin=False,)
   CustomProperties Pin (PinId=264994F14305CCDB8CD59E956000B4F0,PinName="B",PinType.PinCategory="int",PinType.PinSubCategory="",PinType.PinSubCategoryObject=None,PinType.PinSubCategoryMemberReference=(),PinType.PinValueType=(),PinType.ContainerType=None,PinType.bIsReference=False,PinType.bIsConst=False,PinType.bIsWeakPointer=False,PinType.bIsUObjectWrapper=False,PinType.bSerializeAsSinglePrecisionFloat=False,DefaultValue="0",AutogeneratedDefaultValue="0",PersistentGuid=00000000000000000000000000000000,bHidden=False,bNotConnectable=False,bDefaultValueIsReadOnly=False,bDefaultValueIsIgnored=False,bAdvancedView=False,bOrphanedPin=False,)
   CustomProperties Pin (PinId=28F99B934B32A9C6F764B8BF9DF0FEAC,PinName="ReturnValue",Direction="EGPD_Output",PinType.PinCategory="bool",PinType.PinSubCategory="",PinType.PinSubCategoryObject=None,PinType.PinSubCategoryMemberReference=(),PinType.PinValueType=(),PinType.ContainerType=None,PinType.bIsReference=False,PinType.bIsConst=False,PinType.bIsWeakPointer=False,PinType.bIsUObjectWrapper=False,PinType.bSerializeAsSinglePrecisionFloat=False,DefaultValue="false",AutogeneratedDefaultValue="false",LinkedTo=(K2Node_IfThenElse_0 637C0BF04770D456FB3AA68D3ED04867,),PersistentGuid=00000000000000000000000000000000,bHidden=False,bNotConnectable=False,bDefaultValueIsReadOnly=False,bDefaultValueIsIgnored=False,bAdvancedView=False,bOrphanedPin=False,)
End Object
Begin Object Class=/Script/BlueprintGraph.K2Node_IfThenElse Name="K2Node_IfThenElse_0" ExportPath="/Script/BlueprintGraph.K2Node_IfThenElse'/Game/Blueprints/VideoHUD.VideoHUD:Setup Input.K2Node_IfThenElse_0'"
   NodePosX=-208
   NodePosY=-16
   NodeGuid=5BF9690B47B142D03BDE5D94080D2408
   CustomProperties Pin (PinId=B6DE4CB446216B44F9FB8ABD22161340,PinName="execute",PinType.PinCategory="exec",PinType.PinSubCategory="",PinType.PinSubCategoryObject=None,PinType.PinSubCategoryMemberReference=(),PinType.PinValueType=(),PinType.ContainerType=None,PinType.bIsReference=False,PinType.bIsConst=False,PinType.bIsWeakPointer=False,PinType.bIsUObjectWrapper=False,PinType.bSerializeAsSinglePrecisionFloat=False,LinkedTo=(K2Node_CallFunction_179 160A6BAB416446FF9CFC838762B58A92,),PersistentGuid=00000000000000000000000000000000,bHidden=False,bNotConnectable=False,bDefaultValueIsReadOnly=False,bDefaultValueIsIgnored=False,bAdvancedView=False,bOrphanedPin=False,)
   CustomProperties Pin (PinId=637C0BF04770D456FB3AA68D3ED04867,PinName="Condition",PinType.PinCategory="bool",PinType.PinSubCategory="",PinType.PinSubCategoryObject=None,PinType.PinSubCategoryMemberReference=(),PinType.PinValueType=(),PinType.ContainerType=None,PinType.bIsReference=False,PinType.bIsConst=False,PinType.bIsWeakPointer=False,PinType.bIsUObjectWrapper=False,PinType.bSerializeAsSinglePrecisionFloat=False,DefaultValue="true",AutogeneratedDefaultValue="true",LinkedTo=(K2Node_CallFunction_180 28F99B934B32A9C6F764B8BF9DF0FEAC,),PersistentGuid=00000000000000000000000000000000,bHidden=False,bNotConnectable=False,bDefaultValueIsReadOnly=False,bDefaultValueIsIgnored=False,bAdvancedView=False,bOrphanedPin=False,)
   CustomProperties Pin (PinId=A633E47B4BC635273ECB23A49C75B7CA,PinName="then",PinFriendlyName=NSLOCTEXT("K2Node", "true", "true"),Direction="EGPD_Output",PinType.PinCategory="exec",PinType.PinSubCategory="",PinType.PinSubCategoryObject=None,PinType.PinSubCategoryMemberReference=(),PinType.PinValueType=(),PinType.ContainerType=None,PinType.bIsReference=False,PinType.bIsConst=False,PinType.bIsWeakPointer=False,PinType.bIsUObjectWrapper=False,PinType.bSerializeAsSinglePrecisionFloat=False,LinkedTo=(K2Node_SpawnActorFromClass_1 3937017044422AD800BB9F95A03FA906,),PersistentGuid=00000000000000000000000000000000,bHidden=False,bNotConnectable=False,bDefaultValueIsReadOnly=False,bDefaultValueIsIgnored=False,bAdvancedView=False,bOrphanedPin=False,)
   CustomProperties Pin (PinId=DC2C70104E5FFB08588E49A25B183569,PinName="else",PinFriendlyName=NSLOCTEXT("K2Node", "false", "false"),Direction="EGPD_Output",PinType.PinCategory="exec",PinType.PinSubCategory="",PinType.PinSubCategoryObject=None,PinType.PinSubCategoryMemberReference=(),PinType.PinValueType=(),PinType.ContainerType=None,PinType.bIsReference=False,PinType.bIsConst=False,PinType.bIsWeakPointer=False,PinType.bIsUObjectWrapper=False,PinType.bSerializeAsSinglePrecisionFloat=False,PersistentGuid=00000000000000000000000000000000,bHidden=False,bNotConnectable=False,bDefaultValueIsReadOnly=False,bDefaultValueIsIgnored=False,bAdvancedView=False,bOrphanedPin=False,)
End Object
To initialize our HTML page for the UI, setup the view and set the input to the view in the blueprint you created.
   Begin Object Class=/Script/BlueprintGraph.K2Node_Event Name="K2Node_Event_0" ExportPath="/Script/BlueprintGraph.K2Node_Event'/Game/Blueprints/VideoHUD.VideoHUD:EventGraph.K2Node_Event_0'"
   EventReference=(MemberParent="/Script/CoreUObject.Class'/Script/Engine.Actor'",MemberName="ReceiveBeginPlay")
   bOverrideFunction=True
   NodePosX=-1440
   NodePosY=32
   bCommentBubblePinned=True
   NodeGuid=BD30C466430AB55CBE6978B0BD3FCAE1
   CustomProperties Pin (PinId=2224E9624654AEDF98B4FD81E9D23659,PinName="OutputDelegate",Direction="EGPD_Output",PinType.PinCategory="delegate",PinType.PinSubCategory="",PinType.PinSubCategoryObject=None,PinType.PinSubCategoryMemberReference=(MemberParent="/Script/CoreUObject.Class'/Script/Engine.Actor'",MemberName="ReceiveBeginPlay"),PinType.PinValueType=(),PinType.ContainerType=None,PinType.bIsReference=False,PinType.bIsConst=False,PinType.bIsWeakPointer=False,PinType.bIsUObjectWrapper=False,PinType.bSerializeAsSinglePrecisionFloat=False,PersistentGuid=00000000000000000000000000000000,bHidden=False,bNotConnectable=False,bDefaultValueIsReadOnly=False,bDefaultValueIsIgnored=False,bAdvancedView=False,bOrphanedPin=False,)
   CustomProperties Pin (PinId=EADCE4AD48A53F636A7FAAB34801BFF3,PinName="then",Direction="EGPD_Output",PinType.PinCategory="exec",PinType.PinSubCategory="",PinType.PinSubCategoryObject=None,PinType.PinSubCategoryMemberReference=(),PinType.PinValueType=(),PinType.ContainerType=None,PinType.bIsReference=False,PinType.bIsConst=False,PinType.bIsWeakPointer=False,PinType.bIsUObjectWrapper=False,PinType.bSerializeAsSinglePrecisionFloat=False,LinkedTo=(K2Node_CallFunction_2 742177D846FBC8E6AD684CA2A05B2A2B,),PersistentGuid=00000000000000000000000000000000,bHidden=False,bNotConnectable=False,bDefaultValueIsReadOnly=False,bDefaultValueIsIgnored=False,bAdvancedView=False,bOrphanedPin=False,)
End Object
Begin Object Class=/Script/BlueprintGraph.K2Node_CallFunction Name="K2Node_CallFunction_2" ExportPath="/Script/BlueprintGraph.K2Node_CallFunction'/Game/Blueprints/VideoHUD.VideoHUD:EventGraph.K2Node_CallFunction_2'"
   FunctionReference=(MemberName="SetupView",bSelfContext=True)
   NodePosX=-1136
   NodePosY=32
   NodeGuid=EB9F94AC4ED2EADACCCE69BB9D7A9332
   CustomProperties Pin (PinId=742177D846FBC8E6AD684CA2A05B2A2B,PinName="execute",PinToolTip="
Exec",PinType.PinCategory="exec",PinType.PinSubCategory="",PinType.PinSubCategoryObject=None,PinType.PinSubCategoryMemberReference=(),PinType.PinValueType=(),PinType.ContainerType=None,PinType.bIsReference=False,PinType.bIsConst=False,PinType.bIsWeakPointer=False,PinType.bIsUObjectWrapper=False,PinType.bSerializeAsSinglePrecisionFloat=False,LinkedTo=(K2Node_Event_0 EADCE4AD48A53F636A7FAAB34801BFF3,),PersistentGuid=00000000000000000000000000000000,bHidden=False,bNotConnectable=False,bDefaultValueIsReadOnly=False,bDefaultValueIsIgnored=False,bAdvancedView=False,bOrphanedPin=False,)
   CustomProperties Pin (PinId=80DDBEF64748E8A50ECE8FB7207FBC69,PinName="then",PinToolTip="
Exec",Direction="EGPD_Output",PinType.PinCategory="exec",PinType.PinSubCategory="",PinType.PinSubCategoryObject=None,PinType.PinSubCategoryMemberReference=(),PinType.PinValueType=(),PinType.ContainerType=None,PinType.bIsReference=False,PinType.bIsConst=False,PinType.bIsWeakPointer=False,PinType.bIsUObjectWrapper=False,PinType.bSerializeAsSinglePrecisionFloat=False,LinkedTo=(K2Node_CallFunction_69 F18B0BF3447CC93D87DA1B9449B3027C,),PersistentGuid=00000000000000000000000000000000,bHidden=False,bNotConnectable=False,bDefaultValueIsReadOnly=False,bDefaultValueIsIgnored=False,bAdvancedView=False,bOrphanedPin=False,)
   CustomProperties Pin (PinId=0340AE1243E83F70096125A77FCCE393,PinName="self",PinFriendlyName=NSLOCTEXT("K2Node", "Target", "Target"),PinToolTip="Target
Gameface Game HUD Object Reference",PinType.PinCategory="object",PinType.PinSubCategory="",PinType.PinSubCategoryObject="/Script/CoreUObject.Class'/Script/CohtmlPlugin.CohtmlGameHUD'",PinType.PinSubCategoryMemberReference=(),PinType.PinValueType=(),PinType.ContainerType=None,PinType.bIsReference=False,PinType.bIsConst=False,PinType.bIsWeakPointer=False,PinType.bIsUObjectWrapper=False,PinType.bSerializeAsSinglePrecisionFloat=False,PersistentGuid=00000000000000000000000000000000,bHidden=False,bNotConnectable=False,bDefaultValueIsReadOnly=False,bDefaultValueIsIgnored=False,bAdvancedView=False,bOrphanedPin=False,)
   CustomProperties Pin (PinId=23BA923946372DEAA578AC8DED73284E,PinName="PageUrl",PinToolTip="Page Url
String",PinType.PinCategory="string",PinType.PinSubCategory="",PinType.PinSubCategoryObject=None,PinType.PinSubCategoryMemberReference=(),PinType.PinValueType=(),PinType.ContainerType=None,PinType.bIsReference=False,PinType.bIsConst=False,PinType.bIsWeakPointer=False,PinType.bIsUObjectWrapper=False,PinType.bSerializeAsSinglePrecisionFloat=False,DefaultValue="coui://uiresources/hover-video/index.html",PersistentGuid=00000000000000000000000000000000,bHidden=False,bNotConnectable=False,bDefaultValueIsReadOnly=False,bDefaultValueIsIgnored=False,bAdvancedView=False,bOrphanedPin=False,)
   CustomProperties Pin (PinId=3D13C6DE4FD3A202BD049FAA533209B4,PinName="bEnableComplexCSSSupport",PinToolTip="Enable Complex CSSSupport
Boolean",PinType.PinCategory="bool",PinType.PinSubCategory="",PinType.PinSubCategoryObject=None,PinType.PinSubCategoryMemberReference=(),PinType.PinValueType=(),PinType.ContainerType=None,PinType.bIsReference=False,PinType.bIsConst=False,PinType.bIsWeakPointer=False,PinType.bIsUObjectWrapper=False,PinType.bSerializeAsSinglePrecisionFloat=False,DefaultValue="true",AutogeneratedDefaultValue="true",PersistentGuid=00000000000000000000000000000000,bHidden=False,bNotConnectable=False,bDefaultValueIsReadOnly=False,bDefaultValueIsIgnored=False,bAdvancedView=False,bOrphanedPin=False,)
   CustomProperties Pin (PinId=5B52B90945E818E3A83EB6B329BA8CB9,PinName="bDelayedUpdate",PinToolTip="Delayed Update
Boolean",PinType.PinCategory="bool",PinType.PinSubCategory="",PinType.PinSubCategoryObject=None,PinType.PinSubCategoryMemberReference=(),PinType.PinValueType=(),PinType.ContainerType=None,PinType.bIsReference=False,PinType.bIsConst=False,PinType.bIsWeakPointer=False,PinType.bIsUObjectWrapper=False,PinType.bSerializeAsSinglePrecisionFloat=False,DefaultValue="false",AutogeneratedDefaultValue="false",PersistentGuid=00000000000000000000000000000000,bHidden=False,bNotConnectable=False,bDefaultValueIsReadOnly=False,bDefaultValueIsIgnored=False,bAdvancedView=False,bOrphanedPin=False,)
   CustomProperties Pin (PinId=0C75E133407C54B06AF6B38095AB1DA7,PinName="bReceiveInput",PinToolTip="Receive Input
Boolean",PinType.PinCategory="bool",PinType.PinSubCategory="",PinType.PinSubCategoryObject=None,PinType.PinSubCategoryMemberReference=(),PinType.PinValueType=(),PinType.ContainerType=None,PinType.bIsReference=False,PinType.bIsConst=False,PinType.bIsWeakPointer=False,PinType.bIsUObjectWrapper=False,PinType.bSerializeAsSinglePrecisionFloat=False,DefaultValue="true",AutogeneratedDefaultValue="true",PersistentGuid=00000000000000000000000000000000,bHidden=False,bNotConnectable=False,bDefaultValueIsReadOnly=False,bDefaultValueIsIgnored=False,bAdvancedView=False,bOrphanedPin=False,)
   CustomProperties Pin (PinId=57E9E0DB4C2D209F76EB41954019E2C5,PinName="bExecuteCommandProcessingWithLayout",PinToolTip="Execute Command Processing with Layout
Boolean",PinType.PinCategory="bool",PinType.PinSubCategory="",PinType.PinSubCategoryObject=None,PinType.PinSubCategoryMemberReference=(),PinType.PinValueType=(),PinType.ContainerType=None,PinType.bIsReference=False,PinType.bIsConst=False,PinType.bIsWeakPointer=False,PinType.bIsUObjectWrapper=False,PinType.bSerializeAsSinglePrecisionFloat=False,DefaultValue="false",AutogeneratedDefaultValue="false",PersistentGuid=00000000000000000000000000000000,bHidden=False,bNotConnectable=False,bDefaultValueIsReadOnly=False,bDefaultValueIsIgnored=False,bAdvancedView=False,bOrphanedPin=False,)
   CustomProperties Pin (PinId=200F914C4622034A0194FAA3196A8BC5,PinName="bUseSurfacePartitioning",PinToolTip="Use Surface Partitioning
Boolean",PinType.PinCategory="bool",PinType.PinSubCategory="",PinType.PinSubCategoryObject=None,PinType.PinSubCategoryMemberReference=(),PinType.PinValueType=(),PinType.ContainerType=None,PinType.bIsReference=False,PinType.bIsConst=False,PinType.bIsWeakPointer=False,PinType.bIsUObjectWrapper=False,PinType.bSerializeAsSinglePrecisionFloat=False,DefaultValue="false",AutogeneratedDefaultValue="false",PersistentGuid=00000000000000000000000000000000,bHidden=False,bNotConnectable=False,bDefaultValueIsReadOnly=False,bDefaultValueIsIgnored=False,bAdvancedView=False,bOrphanedPin=False,)
   CustomProperties Pin (PinId=60A5C51140D80F7848062F876F32C378,PinName="bRunAdvanceConcurrently",PinToolTip="Run Advance Concurrently
Boolean",PinType.PinCategory="bool",PinType.PinSubCategory="",PinType.PinSubCategoryObject=None,PinType.PinSubCategoryMemberReference=(),PinType.PinValueType=(),PinType.ContainerType=None,PinType.bIsReference=False,PinType.bIsConst=False,PinType.bIsWeakPointer=False,PinType.bIsUObjectWrapper=False,PinType.bSerializeAsSinglePrecisionFloat=False,DefaultValue="false",AutogeneratedDefaultValue="false",PersistentGuid=00000000000000000000000000000000,bHidden=False,bNotConnectable=False,bDefaultValueIsReadOnly=False,bDefaultValueIsIgnored=False,bAdvancedView=False,bOrphanedPin=False,)
End Object
Begin Object Class=/Script/BlueprintGraph.K2Node_CallFunction Name="K2Node_CallFunction_69" ExportPath="/Script/BlueprintGraph.K2Node_CallFunction'/Game/Blueprints/VideoHUD.VideoHUD:EventGraph.K2Node_CallFunction_69'"
   FunctionReference=(MemberName="Setup Input",MemberGuid=D84DB3274039FD1B4ECF688FC014B439,bSelfContext=True)
   NodePosX=-688
   NodePosY=32
   NodeGuid=4ED2CE5447337E28284C2D8F4F8EBC89
   CustomProperties Pin (PinId=F18B0BF3447CC93D87DA1B9449B3027C,PinName="execute",PinType.PinCategory="exec",PinType.PinSubCategory="",PinType.PinSubCategoryObject=None,PinType.PinSubCategoryMemberReference=(),PinType.PinValueType=(),PinType.ContainerType=None,PinType.bIsReference=False,PinType.bIsConst=False,PinType.bIsWeakPointer=False,PinType.bIsUObjectWrapper=False,PinType.bSerializeAsSinglePrecisionFloat=False,LinkedTo=(K2Node_CallFunction_2 80DDBEF64748E8A50ECE8FB7207FBC69,),PersistentGuid=00000000000000000000000000000000,bHidden=False,bNotConnectable=False,bDefaultValueIsReadOnly=False,bDefaultValueIsIgnored=False,bAdvancedView=False,bOrphanedPin=False,)
   CustomProperties Pin (PinId=8058C50046BCB64F9BE5388E2751A9D7,PinName="then",Direction="EGPD_Output",PinType.PinCategory="exec",PinType.PinSubCategory="",PinType.PinSubCategoryObject=None,PinType.PinSubCategoryMemberReference=(),PinType.PinValueType=(),PinType.ContainerType=None,PinType.bIsReference=False,PinType.bIsConst=False,PinType.bIsWeakPointer=False,PinType.bIsUObjectWrapper=False,PinType.bSerializeAsSinglePrecisionFloat=False,PersistentGuid=00000000000000000000000000000000,bHidden=False,bNotConnectable=False,bDefaultValueIsReadOnly=False,bDefaultValueIsIgnored=False,bAdvancedView=False,bOrphanedPin=False,)
   CustomProperties Pin (PinId=5D1E035F4CBDBCC8D9EB939E04758A3C,PinName="self",PinFriendlyName=NSLOCTEXT("K2Node", "Target", "Target"),PinType.PinCategory="object",PinType.PinSubCategory="self",PinType.PinSubCategoryObject=None,PinType.PinSubCategoryMemberReference=(),PinType.PinValueType=(),PinType.ContainerType=None,PinType.bIsReference=False,PinType.bIsConst=False,PinType.bIsWeakPointer=False,PinType.bIsUObjectWrapper=False,PinType.bSerializeAsSinglePrecisionFloat=False,PersistentGuid=00000000000000000000000000000000,bHidden=False,bNotConnectable=False,bDefaultValueIsReadOnly=False,bDefaultValueIsIgnored=False,bAdvancedView=False,bOrphanedPin=False,)
End Object
Implementing the blueprint logic
To implement the logic for our animated menu UI, we’ll need to create three variables in our Blueprint:
- Bink Media Players Array: An array of
Bink Media Playeritems that will hold the video files. - Render Targets Array: An array of
Texture Render Targetitems to hold the render textures for each video. - Active Video Booleans Array: An array of
booleanvalues, which we’ll use to control which video is currently active. Each boolean will indicate whether a video at a specific index is playing.
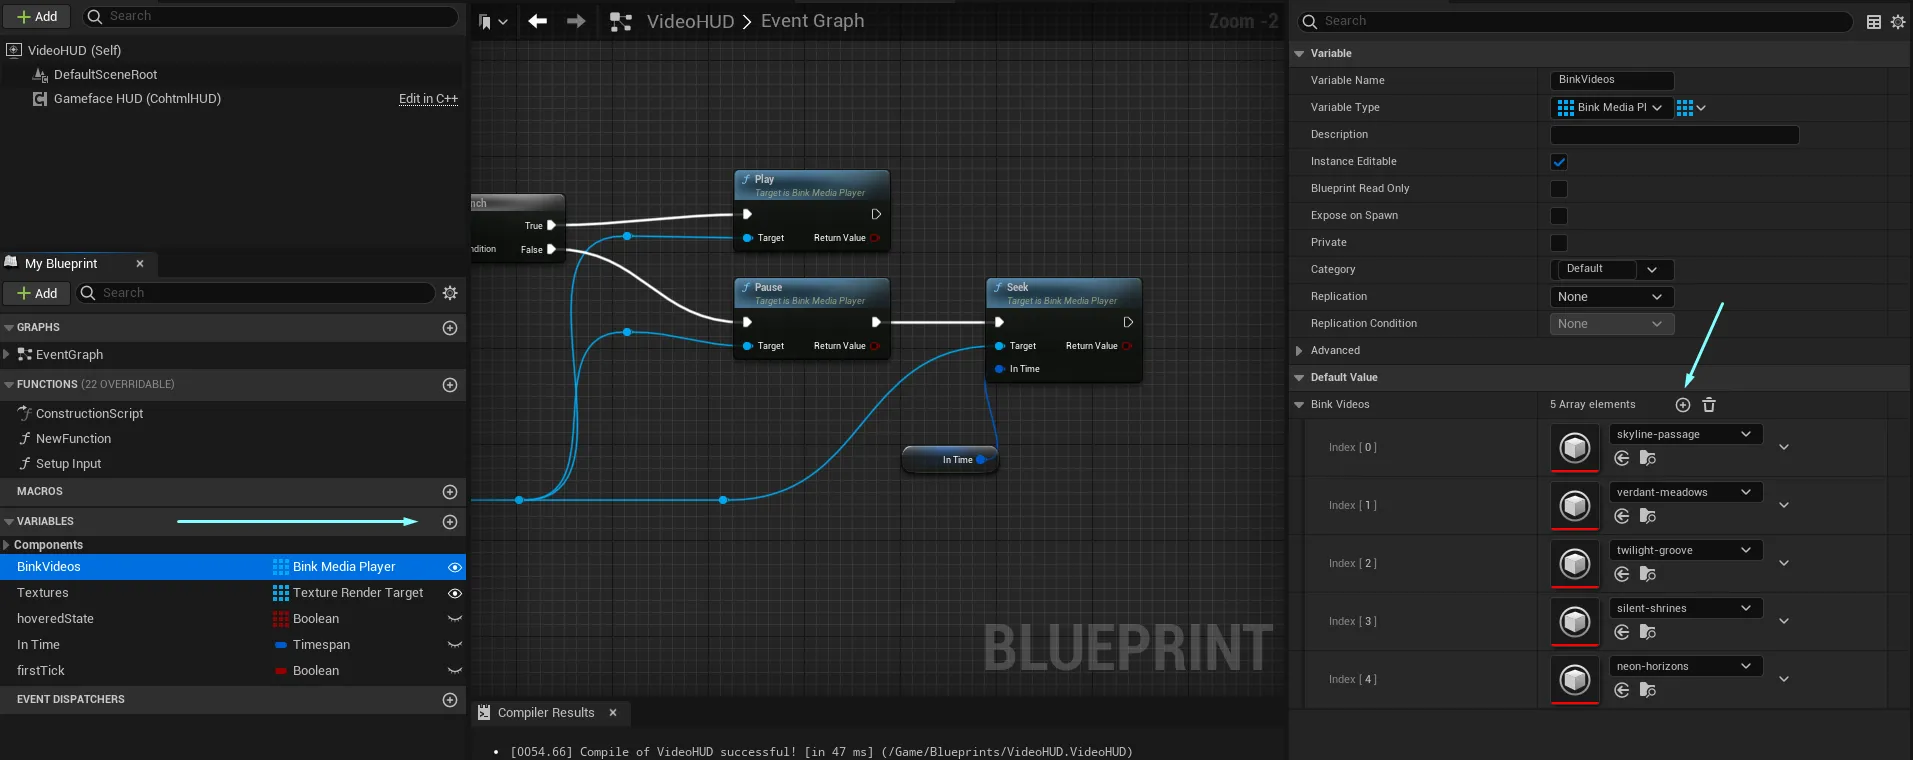
After creating these three array variables with the appropriate types, compile the Blueprint to initialize them. Populate each array with the relevant elements:
- Bink Media Players Array: Add the
Bink videosyou want to display. We named our variableBinkVideos - Render Targets Array: Add the
render targetsfor each video. We named our variableTextures - Active Video Booleans Array: Set each
booleanvalue tofalseby default, so no video is active at the start. We named our variablehoveredState
Important: Ensure that the indexes of each video in the Bink Media Players array correspond to the same indexes in the Render Targets array.
This way, each video will correctly match its respective render target, allowing us to control them accurately within the Blueprint logic.
With that out of the way, let’s start implementing the core logic of our UI.
Implementing video draw logic
As explained in our documentation on Bink integration ,
we need to call the Draw method on each Bink video instance every tick to display them in the UI.
Since we have an array of 5 videos we are going to achieve that with the help of a For Each Loop node.
The loop will iterate through all videos, drawing each one onto the corresponding Render Texture.
By matching the index of each video in the Bink Media Players array with the index in the Render Targets array, we ensure each video displays on its correct texture.
The blueprint setup will look like this:
   Begin Object Class=/Script/BlueprintGraph.K2Node_VariableGet Name="K2Node_VariableGet_4" ExportPath="/Script/BlueprintGraph.K2Node_VariableGet'/Game/Blueprints/VideoHUD.VideoHUD:EventGraph.K2Node_VariableGet_4'"
   VariableReference=(MemberName="BinkVideos",MemberGuid=539828C34B0DC009364097B0D014120D,bSelfContext=True)
   NodePosX=-1312
   NodePosY=1344
   NodeGuid=A99D999F4F398C68198F9F9B7D2E3E6E
   CustomProperties Pin (PinId=C94EAA474336727F0BA4DEB1E845508A,PinName="BinkVideos",Direction="EGPD_Output",PinType.PinCategory="object",PinType.PinSubCategory="",PinType.PinSubCategoryObject="/Script/CoreUObject.Class'/Script/BinkMediaPlayer.BinkMediaPlayer'",PinType.PinSubCategoryMemberReference=(),PinType.PinValueType=(),PinType.ContainerType=Array,PinType.bIsReference=False,PinType.bIsConst=False,PinType.bIsWeakPointer=False,PinType.bIsUObjectWrapper=False,PinType.bSerializeAsSinglePrecisionFloat=False,LinkedTo=(K2Node_MacroInstance_4 34A4D7E64B576AD33F9572B65C917F2A,),PersistentGuid=00000000000000000000000000000000,bHidden=False,bNotConnectable=False,bDefaultValueIsReadOnly=False,bDefaultValueIsIgnored=False,bAdvancedView=False,bOrphanedPin=False,)
   CustomProperties Pin (PinId=2C1BCCD74C1A5C27927DDEA6B62B846B,PinName="self",PinFriendlyName=NSLOCTEXT("K2Node", "Target", "Target"),PinType.PinCategory="object",PinType.PinSubCategory="",PinType.PinSubCategoryObject="/Script/Engine.BlueprintGeneratedClass'/Game/Blueprints/VideoHUD.VideoHUD_C'",PinType.PinSubCategoryMemberReference=(),PinType.PinValueType=(),PinType.ContainerType=None,PinType.bIsReference=False,PinType.bIsConst=False,PinType.bIsWeakPointer=False,PinType.bIsUObjectWrapper=False,PinType.bSerializeAsSinglePrecisionFloat=False,PersistentGuid=00000000000000000000000000000000,bHidden=True,bNotConnectable=False,bDefaultValueIsReadOnly=False,bDefaultValueIsIgnored=False,bAdvancedView=False,bOrphanedPin=False,)
End Object
Begin Object Class=/Script/BlueprintGraph.K2Node_MacroInstance Name="K2Node_MacroInstance_4" ExportPath="/Script/BlueprintGraph.K2Node_MacroInstance'/Game/Blueprints/VideoHUD.VideoHUD:EventGraph.K2Node_MacroInstance_4'"
   MacroGraphReference=(MacroGraph="/Script/Engine.EdGraph'/Engine/EditorBlueprintResources/StandardMacros.StandardMacros:ForEachLoop'",GraphBlueprint="/Script/Engine.Blueprint'/Engine/EditorBlueprintResources/StandardMacros.StandardMacros'",GraphGuid=99DBFD5540A796041F72A5A9DA655026)
   ResolvedWildcardType=(PinCategory="object",PinSubCategoryObject="/Script/CoreUObject.Class'/Script/BinkMediaPlayer.BinkMediaPlayer'",ContainerType=Array)
   NodePosX=-1152
   NodePosY=1200
   NodeGuid=44792F3142CEE03820927EB3871D684A
   CustomProperties Pin (PinId=5F6482154F1D477FAC5832AAC4FCED53,PinName="Exec",PinType.PinCategory="exec",PinType.PinSubCategory="",PinType.PinSubCategoryObject=None,PinType.PinSubCategoryMemberReference=(),PinType.PinValueType=(),PinType.ContainerType=None,PinType.bIsReference=False,PinType.bIsConst=False,PinType.bIsWeakPointer=False,PinType.bIsUObjectWrapper=False,PinType.bSerializeAsSinglePrecisionFloat=False,LinkedTo=(K2Node_Event_9 18BD0FE4427B02059D39ECA4131D5949,),PersistentGuid=00000000000000000000000000000000,bHidden=False,bNotConnectable=False,bDefaultValueIsReadOnly=False,bDefaultValueIsIgnored=False,bAdvancedView=False,bOrphanedPin=False,)
   CustomProperties Pin (PinId=34A4D7E64B576AD33F9572B65C917F2A,PinName="Array",PinType.PinCategory="object",PinType.PinSubCategory="",PinType.PinSubCategoryObject="/Script/CoreUObject.Class'/Script/BinkMediaPlayer.BinkMediaPlayer'",PinType.PinSubCategoryMemberReference=(),PinType.PinValueType=(),PinType.ContainerType=Array,PinType.bIsReference=False,PinType.bIsConst=False,PinType.bIsWeakPointer=False,PinType.bIsUObjectWrapper=False,PinType.bSerializeAsSinglePrecisionFloat=False,LinkedTo=(K2Node_VariableGet_4 C94EAA474336727F0BA4DEB1E845508A,),PersistentGuid=00000000000000000000000000000000,bHidden=False,bNotConnectable=False,bDefaultValueIsReadOnly=False,bDefaultValueIsIgnored=False,bAdvancedView=False,bOrphanedPin=False,)
   CustomProperties Pin (PinId=17C1B3CD4DF5F700672977B3E2C70311,PinName="LoopBody",Direction="EGPD_Output",PinType.PinCategory="exec",PinType.PinSubCategory="",PinType.PinSubCategoryObject=None,PinType.PinSubCategoryMemberReference=(),PinType.PinValueType=(),PinType.ContainerType=None,PinType.bIsReference=False,PinType.bIsConst=False,PinType.bIsWeakPointer=False,PinType.bIsUObjectWrapper=False,PinType.bSerializeAsSinglePrecisionFloat=False,LinkedTo=(K2Node_CallFunction_33 E577A7944A92E0E6EA0288BF911DEC9F,),PersistentGuid=00000000000000000000000000000000,bHidden=False,bNotConnectable=False,bDefaultValueIsReadOnly=False,bDefaultValueIsIgnored=False,bAdvancedView=False,bOrphanedPin=False,)
   CustomProperties Pin (PinId=D0A8DAD041D4BA0B9D47AD97D6946BC3,PinName="Array Element",Direction="EGPD_Output",PinType.PinCategory="object",PinType.PinSubCategory="",PinType.PinSubCategoryObject="/Script/CoreUObject.Class'/Script/BinkMediaPlayer.BinkMediaPlayer'",PinType.PinSubCategoryMemberReference=(),PinType.PinValueType=(),PinType.ContainerType=None,PinType.bIsReference=False,PinType.bIsConst=False,PinType.bIsWeakPointer=False,PinType.bIsUObjectWrapper=False,PinType.bSerializeAsSinglePrecisionFloat=False,LinkedTo=(K2Node_CallFunction_33 5066A58C43BD5CAA005DB0BE08C36E2E,K2Node_Knot_11 D61DD5154FACC0300213CB9888B0E0AA,),PersistentGuid=00000000000000000000000000000000,bHidden=False,bNotConnectable=False,bDefaultValueIsReadOnly=False,bDefaultValueIsIgnored=False,bAdvancedView=False,bOrphanedPin=False,)
   CustomProperties Pin (PinId=D26D252244006654583C5FB504D73542,PinName="Array Index",Direction="EGPD_Output",PinType.PinCategory="int",PinType.PinSubCategory="",PinType.PinSubCategoryObject=None,PinType.PinSubCategoryMemberReference=(),PinType.PinValueType=(),PinType.ContainerType=None,PinType.bIsReference=False,PinType.bIsConst=False,PinType.bIsWeakPointer=False,PinType.bIsUObjectWrapper=False,PinType.bSerializeAsSinglePrecisionFloat=False,LinkedTo=(K2Node_GetArrayItem_6 D86B1A1D474D4594A07E779BF54E52E4,K2Node_Knot_9 A5191868458EC4CFAB22FF8771F67FA9,),PersistentGuid=00000000000000000000000000000000,bHidden=False,bNotConnectable=False,bDefaultValueIsReadOnly=False,bDefaultValueIsIgnored=False,bAdvancedView=False,bOrphanedPin=False,)
   CustomProperties Pin (PinId=EF1734B4436CC45F646DCEB31E7DD981,PinName="Completed",Direction="EGPD_Output",PinType.PinCategory="exec",PinType.PinSubCategory="",PinType.PinSubCategoryObject=None,PinType.PinSubCategoryMemberReference=(),PinType.PinValueType=(),PinType.ContainerType=None,PinType.bIsReference=False,PinType.bIsConst=False,PinType.bIsWeakPointer=False,PinType.bIsUObjectWrapper=False,PinType.bSerializeAsSinglePrecisionFloat=False,PersistentGuid=00000000000000000000000000000000,bHidden=False,bNotConnectable=False,bDefaultValueIsReadOnly=False,bDefaultValueIsIgnored=False,bAdvancedView=False,bOrphanedPin=False,)
End Object
Begin Object Class=/Script/BlueprintGraph.K2Node_CallFunction Name="K2Node_CallFunction_33" ExportPath="/Script/BlueprintGraph.K2Node_CallFunction'/Game/Blueprints/VideoHUD.VideoHUD:EventGraph.K2Node_CallFunction_33'"
   FunctionReference=(MemberParent="/Script/CoreUObject.Class'/Script/BinkMediaPlayer.BinkMediaPlayer'",MemberName="Draw")
   NodePosX=-480
   NodePosY=1184
   ErrorType=1
   NodeGuid=FAF265A14B8EBDF03CEF24B686204E0A
   CustomProperties Pin (PinId=E577A7944A92E0E6EA0288BF911DEC9F,PinName="execute",PinToolTip="
Exec",PinType.PinCategory="exec",PinType.PinSubCategory="",PinType.PinSubCategoryObject=None,PinType.PinSubCategoryMemberReference=(),PinType.PinValueType=(),PinType.ContainerType=None,PinType.bIsReference=False,PinType.bIsConst=False,PinType.bIsWeakPointer=False,PinType.bIsUObjectWrapper=False,PinType.bSerializeAsSinglePrecisionFloat=False,LinkedTo=(K2Node_MacroInstance_4 17C1B3CD4DF5F700672977B3E2C70311,),PersistentGuid=00000000000000000000000000000000,bHidden=False,bNotConnectable=False,bDefaultValueIsReadOnly=False,bDefaultValueIsIgnored=False,bAdvancedView=False,bOrphanedPin=False,)
   CustomProperties Pin (PinId=3DF1141248F994D9263F5AA447401FD1,PinName="then",PinToolTip="
Exec",Direction="EGPD_Output",PinType.PinCategory="exec",PinType.PinSubCategory="",PinType.PinSubCategoryObject=None,PinType.PinSubCategoryMemberReference=(),PinType.PinValueType=(),PinType.ContainerType=None,PinType.bIsReference=False,PinType.bIsConst=False,PinType.bIsWeakPointer=False,PinType.bIsUObjectWrapper=False,PinType.bSerializeAsSinglePrecisionFloat=False,LinkedTo=(K2Node_IfThenElse_0 32F8B4574ADAA3E5453A89B85AF3B19D,),PersistentGuid=00000000000000000000000000000000,bHidden=False,bNotConnectable=False,bDefaultValueIsReadOnly=False,bDefaultValueIsIgnored=False,bAdvancedView=False,bOrphanedPin=False,)
   CustomProperties Pin (PinId=5066A58C43BD5CAA005DB0BE08C36E2E,PinName="self",PinFriendlyName=NSLOCTEXT("K2Node", "Target", "Target"),PinToolTip="Target
Bink Media Player Object Reference",PinType.PinCategory="object",PinType.PinSubCategory="",PinType.PinSubCategoryObject="/Script/CoreUObject.Class'/Script/BinkMediaPlayer.BinkMediaPlayer'",PinType.PinSubCategoryMemberReference=(),PinType.PinValueType=(),PinType.ContainerType=None,PinType.bIsReference=False,PinType.bIsConst=False,PinType.bIsWeakPointer=False,PinType.bIsUObjectWrapper=False,PinType.bSerializeAsSinglePrecisionFloat=False,LinkedTo=(K2Node_MacroInstance_4 D0A8DAD041D4BA0B9D47AD97D6946BC3,),PersistentGuid=00000000000000000000000000000000,bHidden=False,bNotConnectable=False,bDefaultValueIsReadOnly=False,bDefaultValueIsIgnored=False,bAdvancedView=False,bOrphanedPin=False,)
   CustomProperties Pin (PinId=0963DDC341D4BA996B36D3A89F198A5F,PinName="texture",PinToolTip="Texture
Texture Object Reference",PinType.PinCategory="object",PinType.PinSubCategory="",PinType.PinSubCategoryObject="/Script/CoreUObject.Class'/Script/Engine.Texture'",PinType.PinSubCategoryMemberReference=(),PinType.PinValueType=(),PinType.ContainerType=None,PinType.bIsReference=False,PinType.bIsConst=False,PinType.bIsWeakPointer=False,PinType.bIsUObjectWrapper=False,PinType.bSerializeAsSinglePrecisionFloat=False,LinkedTo=(K2Node_GetArrayItem_6 979ABEDA4A0CF920472A058F403CA891,),PersistentGuid=00000000000000000000000000000000,bHidden=False,bNotConnectable=False,bDefaultValueIsReadOnly=False,bDefaultValueIsIgnored=False,bAdvancedView=False,bOrphanedPin=False,)
   CustomProperties Pin (PinId=52D2CFFE4F829289CDEEFF8A323A1211,PinName="tonemap",PinToolTip="Tonemap
Boolean",PinType.PinCategory="bool",PinType.PinSubCategory="",PinType.PinSubCategoryObject=None,PinType.PinSubCategoryMemberReference=(),PinType.PinValueType=(),PinType.ContainerType=None,PinType.bIsReference=False,PinType.bIsConst=False,PinType.bIsWeakPointer=False,PinType.bIsUObjectWrapper=False,PinType.bSerializeAsSinglePrecisionFloat=False,DefaultValue="false",AutogeneratedDefaultValue="false",PersistentGuid=00000000000000000000000000000000,bHidden=False,bNotConnectable=False,bDefaultValueIsReadOnly=False,bDefaultValueIsIgnored=False,bAdvancedView=False,bOrphanedPin=False,)
   CustomProperties Pin (PinId=4DCA3D894200A4BDC1124EB80F681C15,PinName="out_nits",PinToolTip="Out Nits
Integer",PinType.PinCategory="int",PinType.PinSubCategory="",PinType.PinSubCategoryObject=None,PinType.PinSubCategoryMemberReference=(),PinType.PinValueType=(),PinType.ContainerType=None,PinType.bIsReference=False,PinType.bIsConst=False,PinType.bIsWeakPointer=False,PinType.bIsUObjectWrapper=False,PinType.bSerializeAsSinglePrecisionFloat=False,DefaultValue="10000",AutogeneratedDefaultValue="10000",PersistentGuid=00000000000000000000000000000000,bHidden=False,bNotConnectable=False,bDefaultValueIsReadOnly=False,bDefaultValueIsIgnored=False,bAdvancedView=False,bOrphanedPin=False,)
   CustomProperties Pin (PinId=01C8AE4B40520E9B38C3A9A8414605E4,PinName="alpha",PinToolTip="Alpha
Float (single-precision)",PinType.PinCategory="real",PinType.PinSubCategory="float",PinType.PinSubCategoryObject=None,PinType.PinSubCategoryMemberReference=(),PinType.PinValueType=(),PinType.ContainerType=None,PinType.bIsReference=False,PinType.bIsConst=False,PinType.bIsWeakPointer=False,PinType.bIsUObjectWrapper=False,PinType.bSerializeAsSinglePrecisionFloat=False,DefaultValue="1.000000",AutogeneratedDefaultValue="1.000000",PersistentGuid=00000000000000000000000000000000,bHidden=False,bNotConnectable=False,bDefaultValueIsReadOnly=False,bDefaultValueIsIgnored=False,bAdvancedView=False,bOrphanedPin=False,)
   CustomProperties Pin (PinId=432A143F4A021FCCDE8802A5863DA04B,PinName="srgb_decode",PinToolTip="Srgb Decode
Boolean",PinType.PinCategory="bool",PinType.PinSubCategory="",PinType.PinSubCategoryObject=None,PinType.PinSubCategoryMemberReference=(),PinType.PinValueType=(),PinType.ContainerType=None,PinType.bIsReference=False,PinType.bIsConst=False,PinType.bIsWeakPointer=False,PinType.bIsUObjectWrapper=False,PinType.bSerializeAsSinglePrecisionFloat=False,DefaultValue="false",AutogeneratedDefaultValue="false",PersistentGuid=00000000000000000000000000000000,bHidden=False,bNotConnectable=False,bDefaultValueIsReadOnly=False,bDefaultValueIsIgnored=False,bAdvancedView=False,bOrphanedPin=False,)
   CustomProperties Pin (PinId=80F39BD34C58EC65E6E5ECBE4FCA474C,PinName="hdr",PinToolTip="Hdr
Boolean",PinType.PinCategory="bool",PinType.PinSubCategory="",PinType.PinSubCategoryObject=None,PinType.PinSubCategoryMemberReference=(),PinType.PinValueType=(),PinType.ContainerType=None,PinType.bIsReference=False,PinType.bIsConst=False,PinType.bIsWeakPointer=False,PinType.bIsUObjectWrapper=False,PinType.bSerializeAsSinglePrecisionFloat=False,DefaultValue="false",AutogeneratedDefaultValue="false",PersistentGuid=00000000000000000000000000000000,bHidden=False,bNotConnectable=False,bDefaultValueIsReadOnly=False,bDefaultValueIsIgnored=False,bAdvancedView=False,bOrphanedPin=False,)
End Object
Begin Object Class=/Script/BlueprintGraph.K2Node_VariableGet Name="K2Node_VariableGet_11" ExportPath="/Script/BlueprintGraph.K2Node_VariableGet'/Game/Blueprints/VideoHUD.VideoHUD:EventGraph.K2Node_VariableGet_11'"
   VariableReference=(MemberName="Textures",MemberGuid=49AF56964895DE554A271DB68412C1C5,bSelfContext=True)
   NodePosX=-864
   NodePosY=1360
   NodeGuid=7C1BBE544258235D444226A740078059
   CustomProperties Pin (PinId=60A3038E417F4E9AA8643C9366246ACF,PinName="Textures",Direction="EGPD_Output",PinType.PinCategory="object",PinType.PinSubCategory="",PinType.PinSubCategoryObject="/Script/CoreUObject.Class'/Script/Engine.TextureRenderTarget'",PinType.PinSubCategoryMemberReference=(),PinType.PinValueType=(),PinType.ContainerType=Array,PinType.bIsReference=False,PinType.bIsConst=False,PinType.bIsWeakPointer=False,PinType.bIsUObjectWrapper=False,PinType.bSerializeAsSinglePrecisionFloat=False,LinkedTo=(K2Node_GetArrayItem_6 469D2C474F9590ECC8ED3184F713CCD3,),PersistentGuid=00000000000000000000000000000000,bHidden=False,bNotConnectable=False,bDefaultValueIsReadOnly=False,bDefaultValueIsIgnored=False,bAdvancedView=False,bOrphanedPin=False,)
   CustomProperties Pin (PinId=597694FD4C4A09F646AE67A3ACD6DD30,PinName="self",PinFriendlyName=NSLOCTEXT("K2Node", "Target", "Target"),PinType.PinCategory="object",PinType.PinSubCategory="",PinType.PinSubCategoryObject="/Script/Engine.BlueprintGeneratedClass'/Game/Blueprints/VideoHUD.VideoHUD_C'",PinType.PinSubCategoryMemberReference=(),PinType.PinValueType=(),PinType.ContainerType=None,PinType.bIsReference=False,PinType.bIsConst=False,PinType.bIsWeakPointer=False,PinType.bIsUObjectWrapper=False,PinType.bSerializeAsSinglePrecisionFloat=False,PersistentGuid=00000000000000000000000000000000,bHidden=True,bNotConnectable=False,bDefaultValueIsReadOnly=False,bDefaultValueIsIgnored=False,bAdvancedView=False,bOrphanedPin=False,)
End Object
Begin Object Class=/Script/BlueprintGraph.K2Node_GetArrayItem Name="K2Node_GetArrayItem_6" ExportPath="/Script/BlueprintGraph.K2Node_GetArrayItem'/Game/Blueprints/VideoHUD.VideoHUD:EventGraph.K2Node_GetArrayItem_6'"
   bReturnByRefDesired=False
   NodePosX=-704
   NodePosY=1296
   NodeGuid=C112F4844DFCB331CD0427AF0B5B02DD
   CustomProperties Pin (PinId=469D2C474F9590ECC8ED3184F713CCD3,PinName="Array",PinType.PinCategory="object",PinType.PinSubCategory="",PinType.PinSubCategoryObject="/Script/CoreUObject.Class'/Script/Engine.TextureRenderTarget'",PinType.PinSubCategoryMemberReference=(),PinType.PinValueType=(),PinType.ContainerType=Array,PinType.bIsReference=False,PinType.bIsConst=False,PinType.bIsWeakPointer=False,PinType.bIsUObjectWrapper=False,PinType.bSerializeAsSinglePrecisionFloat=False,LinkedTo=(K2Node_VariableGet_11 60A3038E417F4E9AA8643C9366246ACF,),PersistentGuid=00000000000000000000000000000000,bHidden=False,bNotConnectable=False,bDefaultValueIsReadOnly=False,bDefaultValueIsIgnored=False,bAdvancedView=False,bOrphanedPin=False,)
   CustomProperties Pin (PinId=D86B1A1D474D4594A07E779BF54E52E4,PinName="Dimension 1",PinType.PinCategory="int",PinType.PinSubCategory="",PinType.PinSubCategoryObject=None,PinType.PinSubCategoryMemberReference=(),PinType.PinValueType=(),PinType.ContainerType=None,PinType.bIsReference=False,PinType.bIsConst=False,PinType.bIsWeakPointer=False,PinType.bIsUObjectWrapper=False,PinType.bSerializeAsSinglePrecisionFloat=False,DefaultValue="0",AutogeneratedDefaultValue="0",LinkedTo=(K2Node_MacroInstance_4 D26D252244006654583C5FB504D73542,),PersistentGuid=00000000000000000000000000000000,bHidden=False,bNotConnectable=False,bDefaultValueIsReadOnly=False,bDefaultValueIsIgnored=False,bAdvancedView=False,bOrphanedPin=False,)
   CustomProperties Pin (PinId=979ABEDA4A0CF920472A058F403CA891,PinName="Output",Direction="EGPD_Output",PinType.PinCategory="object",PinType.PinSubCategory="",PinType.PinSubCategoryObject="/Script/CoreUObject.Class'/Script/Engine.TextureRenderTarget'",PinType.PinSubCategoryMemberReference=(),PinType.PinValueType=(),PinType.ContainerType=None,PinType.bIsReference=False,PinType.bIsConst=False,PinType.bIsWeakPointer=False,PinType.bIsUObjectWrapper=False,PinType.bSerializeAsSinglePrecisionFloat=False,LinkedTo=(K2Node_CallFunction_33 0963DDC341D4BA996B36D3A89F198A5F,),PersistentGuid=00000000000000000000000000000000,bHidden=False,bNotConnectable=False,bDefaultValueIsReadOnly=False,bDefaultValueIsIgnored=False,bAdvancedView=False,bOrphanedPin=False,)
End Object
Begin Object Class=/Script/BlueprintGraph.K2Node_Event Name="K2Node_Event_9" ExportPath="/Script/BlueprintGraph.K2Node_Event'/Game/Blueprints/VideoHUD.VideoHUD:EventGraph.K2Node_Event_9'"
   EventReference=(MemberParent="/Script/CoreUObject.Class'/Script/Engine.Actor'",MemberName="ReceiveTick")
   bOverrideFunction=True
   NodePosX=-1456
   NodePosY=1200
   NodeGuid=AC171D964A5BA19E52333FA9120B0136
   CustomProperties Pin (PinId=856B990F43F65DB7218F02A186ABC6EE,PinName="OutputDelegate",Direction="EGPD_Output",PinType.PinCategory="delegate",PinType.PinSubCategory="",PinType.PinSubCategoryObject=None,PinType.PinSubCategoryMemberReference=(MemberParent="/Script/CoreUObject.Class'/Script/Engine.Actor'",MemberName="ReceiveTick"),PinType.PinValueType=(),PinType.ContainerType=None,PinType.bIsReference=False,PinType.bIsConst=False,PinType.bIsWeakPointer=False,PinType.bIsUObjectWrapper=False,PinType.bSerializeAsSinglePrecisionFloat=False,PersistentGuid=00000000000000000000000000000000,bHidden=False,bNotConnectable=False,bDefaultValueIsReadOnly=False,bDefaultValueIsIgnored=False,bAdvancedView=False,bOrphanedPin=False,)
   CustomProperties Pin (PinId=18BD0FE4427B02059D39ECA4131D5949,PinName="then",Direction="EGPD_Output",PinType.PinCategory="exec",PinType.PinSubCategory="",PinType.PinSubCategoryObject=None,PinType.PinSubCategoryMemberReference=(),PinType.PinValueType=(),PinType.ContainerType=None,PinType.bIsReference=False,PinType.bIsConst=False,PinType.bIsWeakPointer=False,PinType.bIsUObjectWrapper=False,PinType.bSerializeAsSinglePrecisionFloat=False,LinkedTo=(K2Node_MacroInstance_4 5F6482154F1D477FAC5832AAC4FCED53,),PersistentGuid=00000000000000000000000000000000,bHidden=False,bNotConnectable=False,bDefaultValueIsReadOnly=False,bDefaultValueIsIgnored=False,bAdvancedView=False,bOrphanedPin=False,)
   CustomProperties Pin (PinId=D3FCA1754AA67B2B0BB41DB4832F33FF,PinName="DeltaSeconds",PinToolTip="Delta Seconds
Float (single-precision)",Direction="EGPD_Output",PinType.PinCategory="real",PinType.PinSubCategory="float",PinType.PinSubCategoryObject=None,PinType.PinSubCategoryMemberReference=(),PinType.PinValueType=(),PinType.ContainerType=None,PinType.bIsReference=False,PinType.bIsConst=False,PinType.bIsWeakPointer=False,PinType.bIsUObjectWrapper=False,PinType.bSerializeAsSinglePrecisionFloat=False,DefaultValue="0.0",AutogeneratedDefaultValue="0.0",PersistentGuid=00000000000000000000000000000000,bHidden=False,bNotConnectable=False,bDefaultValueIsReadOnly=False,bDefaultValueIsIgnored=False,bAdvancedView=False,bOrphanedPin=False,)
End Object
Implementing our custom event
To meet our goal of playing each video only when it’s interacted with, we’ll use the custom event we defined earlier in C++.
You can add this event in the Blueprint by right-clicking in the editor and searching for the name we assigned it — Toggle Play in this case.
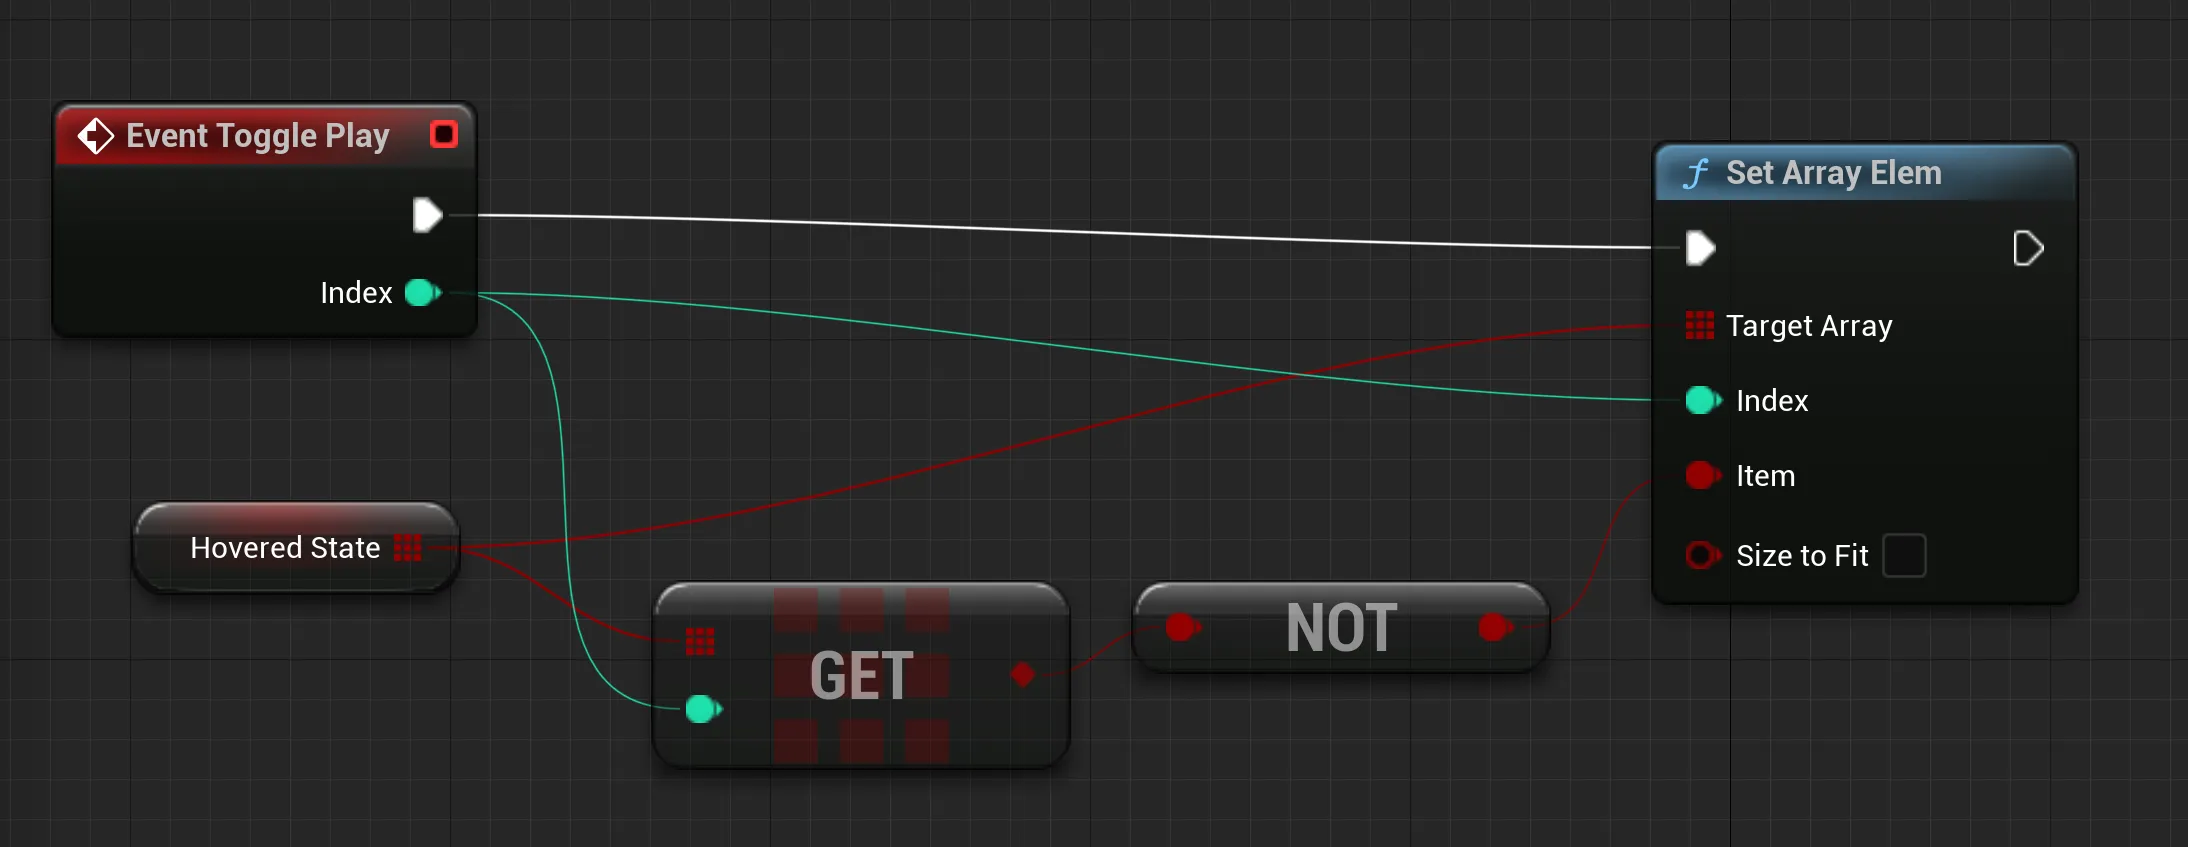
The logic is straightforward. We’ll use the Toggle Play event to toggle the values in our boolean array. In the Event Tick,
we’ll check which index in the boolean array is set to true, indicating the active video. Only the video at that index will play, while others will pause.
We’ll send the appropriate video index as a parameter to the event from the frontend, allowing us to target specific videos. In the Blueprint, the setup looks like this:
Putting it all together
With our custom event in place, we can now enhance our logic by iterating over the Booleans array to determine the active video. For each boolean in the array:
- If the value is
true, we play the corresponding video. - If the value is
false, we pause the video.
Additionally, we can call the seek method to reset the video when switching states, ensuring each video starts from the beginning upon activation.
As the seek method expects to be passed a time, we can just drag the node and click promote to variable and leave it like that as it defaults to 00:00.
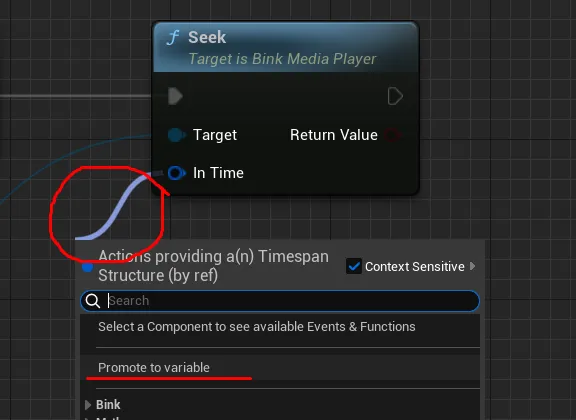
The complete setup, with all the necessary nodes added, will look like this:
   Begin Object Class=/Script/BlueprintGraph.K2Node_VariableGet Name="K2Node_VariableGet_4" ExportPath="/Script/BlueprintGraph.K2Node_VariableGet'/Game/Blueprints/VideoHUD.VideoHUD:EventGraph.K2Node_VariableGet_4'"
   VariableReference=(MemberName="BinkVideos",MemberGuid=539828C34B0DC009364097B0D014120D,bSelfContext=True)
   NodePosX=-1312
   NodePosY=1344
   NodeGuid=A99D999F4F398C68198F9F9B7D2E3E6E
   CustomProperties Pin (PinId=C94EAA474336727F0BA4DEB1E845508A,PinName="BinkVideos",Direction="EGPD_Output",PinType.PinCategory="object",PinType.PinSubCategory="",PinType.PinSubCategoryObject="/Script/CoreUObject.Class'/Script/BinkMediaPlayer.BinkMediaPlayer'",PinType.PinSubCategoryMemberReference=(),PinType.PinValueType=(),PinType.ContainerType=Array,PinType.bIsReference=False,PinType.bIsConst=False,PinType.bIsWeakPointer=False,PinType.bIsUObjectWrapper=False,PinType.bSerializeAsSinglePrecisionFloat=False,LinkedTo=(K2Node_MacroInstance_4 34A4D7E64B576AD33F9572B65C917F2A,),PersistentGuid=00000000000000000000000000000000,bHidden=False,bNotConnectable=False,bDefaultValueIsReadOnly=False,bDefaultValueIsIgnored=False,bAdvancedView=False,bOrphanedPin=False,)
   CustomProperties Pin (PinId=2C1BCCD74C1A5C27927DDEA6B62B846B,PinName="self",PinFriendlyName=NSLOCTEXT("K2Node", "Target", "Target"),PinType.PinCategory="object",PinType.PinSubCategory="",PinType.PinSubCategoryObject="/Script/Engine.BlueprintGeneratedClass'/Game/Blueprints/VideoHUD.VideoHUD_C'",PinType.PinSubCategoryMemberReference=(),PinType.PinValueType=(),PinType.ContainerType=None,PinType.bIsReference=False,PinType.bIsConst=False,PinType.bIsWeakPointer=False,PinType.bIsUObjectWrapper=False,PinType.bSerializeAsSinglePrecisionFloat=False,PersistentGuid=00000000000000000000000000000000,bHidden=True,bNotConnectable=False,bDefaultValueIsReadOnly=False,bDefaultValueIsIgnored=False,bAdvancedView=False,bOrphanedPin=False,)
End Object
Begin Object Class=/Script/BlueprintGraph.K2Node_MacroInstance Name="K2Node_MacroInstance_4" ExportPath="/Script/BlueprintGraph.K2Node_MacroInstance'/Game/Blueprints/VideoHUD.VideoHUD:EventGraph.K2Node_MacroInstance_4'"
   MacroGraphReference=(MacroGraph="/Script/Engine.EdGraph'/Engine/EditorBlueprintResources/StandardMacros.StandardMacros:ForEachLoop'",GraphBlueprint="/Script/Engine.Blueprint'/Engine/EditorBlueprintResources/StandardMacros.StandardMacros'",GraphGuid=99DBFD5540A796041F72A5A9DA655026)
   ResolvedWildcardType=(PinCategory="object",PinSubCategoryObject="/Script/CoreUObject.Class'/Script/BinkMediaPlayer.BinkMediaPlayer'",ContainerType=Array)
   NodePosX=-1152
   NodePosY=1200
   NodeGuid=44792F3142CEE03820927EB3871D684A
   CustomProperties Pin (PinId=5F6482154F1D477FAC5832AAC4FCED53,PinName="Exec",PinType.PinCategory="exec",PinType.PinSubCategory="",PinType.PinSubCategoryObject=None,PinType.PinSubCategoryMemberReference=(),PinType.PinValueType=(),PinType.ContainerType=None,PinType.bIsReference=False,PinType.bIsConst=False,PinType.bIsWeakPointer=False,PinType.bIsUObjectWrapper=False,PinType.bSerializeAsSinglePrecisionFloat=False,LinkedTo=(K2Node_Event_9 18BD0FE4427B02059D39ECA4131D5949,),PersistentGuid=00000000000000000000000000000000,bHidden=False,bNotConnectable=False,bDefaultValueIsReadOnly=False,bDefaultValueIsIgnored=False,bAdvancedView=False,bOrphanedPin=False,)
   CustomProperties Pin (PinId=34A4D7E64B576AD33F9572B65C917F2A,PinName="Array",PinType.PinCategory="object",PinType.PinSubCategory="",PinType.PinSubCategoryObject="/Script/CoreUObject.Class'/Script/BinkMediaPlayer.BinkMediaPlayer'",PinType.PinSubCategoryMemberReference=(),PinType.PinValueType=(),PinType.ContainerType=Array,PinType.bIsReference=False,PinType.bIsConst=False,PinType.bIsWeakPointer=False,PinType.bIsUObjectWrapper=False,PinType.bSerializeAsSinglePrecisionFloat=False,LinkedTo=(K2Node_VariableGet_4 C94EAA474336727F0BA4DEB1E845508A,),PersistentGuid=00000000000000000000000000000000,bHidden=False,bNotConnectable=False,bDefaultValueIsReadOnly=False,bDefaultValueIsIgnored=False,bAdvancedView=False,bOrphanedPin=False,)
   CustomProperties Pin (PinId=17C1B3CD4DF5F700672977B3E2C70311,PinName="LoopBody",Direction="EGPD_Output",PinType.PinCategory="exec",PinType.PinSubCategory="",PinType.PinSubCategoryObject=None,PinType.PinSubCategoryMemberReference=(),PinType.PinValueType=(),PinType.ContainerType=None,PinType.bIsReference=False,PinType.bIsConst=False,PinType.bIsWeakPointer=False,PinType.bIsUObjectWrapper=False,PinType.bSerializeAsSinglePrecisionFloat=False,LinkedTo=(K2Node_CallFunction_33 E577A7944A92E0E6EA0288BF911DEC9F,),PersistentGuid=00000000000000000000000000000000,bHidden=False,bNotConnectable=False,bDefaultValueIsReadOnly=False,bDefaultValueIsIgnored=False,bAdvancedView=False,bOrphanedPin=False,)
   CustomProperties Pin (PinId=D0A8DAD041D4BA0B9D47AD97D6946BC3,PinName="Array Element",Direction="EGPD_Output",PinType.PinCategory="object",PinType.PinSubCategory="",PinType.PinSubCategoryObject="/Script/CoreUObject.Class'/Script/BinkMediaPlayer.BinkMediaPlayer'",PinType.PinSubCategoryMemberReference=(),PinType.PinValueType=(),PinType.ContainerType=None,PinType.bIsReference=False,PinType.bIsConst=False,PinType.bIsWeakPointer=False,PinType.bIsUObjectWrapper=False,PinType.bSerializeAsSinglePrecisionFloat=False,LinkedTo=(K2Node_CallFunction_33 5066A58C43BD5CAA005DB0BE08C36E2E,K2Node_Knot_11 D61DD5154FACC0300213CB9888B0E0AA,),PersistentGuid=00000000000000000000000000000000,bHidden=False,bNotConnectable=False,bDefaultValueIsReadOnly=False,bDefaultValueIsIgnored=False,bAdvancedView=False,bOrphanedPin=False,)
   CustomProperties Pin (PinId=D26D252244006654583C5FB504D73542,PinName="Array Index",Direction="EGPD_Output",PinType.PinCategory="int",PinType.PinSubCategory="",PinType.PinSubCategoryObject=None,PinType.PinSubCategoryMemberReference=(),PinType.PinValueType=(),PinType.ContainerType=None,PinType.bIsReference=False,PinType.bIsConst=False,PinType.bIsWeakPointer=False,PinType.bIsUObjectWrapper=False,PinType.bSerializeAsSinglePrecisionFloat=False,LinkedTo=(K2Node_GetArrayItem_6 D86B1A1D474D4594A07E779BF54E52E4,K2Node_Knot_9 A5191868458EC4CFAB22FF8771F67FA9,),PersistentGuid=00000000000000000000000000000000,bHidden=False,bNotConnectable=False,bDefaultValueIsReadOnly=False,bDefaultValueIsIgnored=False,bAdvancedView=False,bOrphanedPin=False,)
   CustomProperties Pin (PinId=EF1734B4436CC45F646DCEB31E7DD981,PinName="Completed",Direction="EGPD_Output",PinType.PinCategory="exec",PinType.PinSubCategory="",PinType.PinSubCategoryObject=None,PinType.PinSubCategoryMemberReference=(),PinType.PinValueType=(),PinType.ContainerType=None,PinType.bIsReference=False,PinType.bIsConst=False,PinType.bIsWeakPointer=False,PinType.bIsUObjectWrapper=False,PinType.bSerializeAsSinglePrecisionFloat=False,PersistentGuid=00000000000000000000000000000000,bHidden=False,bNotConnectable=False,bDefaultValueIsReadOnly=False,bDefaultValueIsIgnored=False,bAdvancedView=False,bOrphanedPin=False,)
End Object
Begin Object Class=/Script/BlueprintGraph.K2Node_CallFunction Name="K2Node_CallFunction_33" ExportPath="/Script/BlueprintGraph.K2Node_CallFunction'/Game/Blueprints/VideoHUD.VideoHUD:EventGraph.K2Node_CallFunction_33'"
   FunctionReference=(MemberParent="/Script/CoreUObject.Class'/Script/BinkMediaPlayer.BinkMediaPlayer'",MemberName="Draw")
   NodePosX=-480
   NodePosY=1184
   ErrorType=1
   NodeGuid=FAF265A14B8EBDF03CEF24B686204E0A
   CustomProperties Pin (PinId=E577A7944A92E0E6EA0288BF911DEC9F,PinName="execute",PinToolTip="
Exec",PinType.PinCategory="exec",PinType.PinSubCategory="",PinType.PinSubCategoryObject=None,PinType.PinSubCategoryMemberReference=(),PinType.PinValueType=(),PinType.ContainerType=None,PinType.bIsReference=False,PinType.bIsConst=False,PinType.bIsWeakPointer=False,PinType.bIsUObjectWrapper=False,PinType.bSerializeAsSinglePrecisionFloat=False,LinkedTo=(K2Node_MacroInstance_4 17C1B3CD4DF5F700672977B3E2C70311,),PersistentGuid=00000000000000000000000000000000,bHidden=False,bNotConnectable=False,bDefaultValueIsReadOnly=False,bDefaultValueIsIgnored=False,bAdvancedView=False,bOrphanedPin=False,)
   CustomProperties Pin (PinId=3DF1141248F994D9263F5AA447401FD1,PinName="then",PinToolTip="
Exec",Direction="EGPD_Output",PinType.PinCategory="exec",PinType.PinSubCategory="",PinType.PinSubCategoryObject=None,PinType.PinSubCategoryMemberReference=(),PinType.PinValueType=(),PinType.ContainerType=None,PinType.bIsReference=False,PinType.bIsConst=False,PinType.bIsWeakPointer=False,PinType.bIsUObjectWrapper=False,PinType.bSerializeAsSinglePrecisionFloat=False,LinkedTo=(K2Node_IfThenElse_0 32F8B4574ADAA3E5453A89B85AF3B19D,),PersistentGuid=00000000000000000000000000000000,bHidden=False,bNotConnectable=False,bDefaultValueIsReadOnly=False,bDefaultValueIsIgnored=False,bAdvancedView=False,bOrphanedPin=False,)
   CustomProperties Pin (PinId=5066A58C43BD5CAA005DB0BE08C36E2E,PinName="self",PinFriendlyName=NSLOCTEXT("K2Node", "Target", "Target"),PinToolTip="Target
Bink Media Player Object Reference",PinType.PinCategory="object",PinType.PinSubCategory="",PinType.PinSubCategoryObject="/Script/CoreUObject.Class'/Script/BinkMediaPlayer.BinkMediaPlayer'",PinType.PinSubCategoryMemberReference=(),PinType.PinValueType=(),PinType.ContainerType=None,PinType.bIsReference=False,PinType.bIsConst=False,PinType.bIsWeakPointer=False,PinType.bIsUObjectWrapper=False,PinType.bSerializeAsSinglePrecisionFloat=False,LinkedTo=(K2Node_MacroInstance_4 D0A8DAD041D4BA0B9D47AD97D6946BC3,),PersistentGuid=00000000000000000000000000000000,bHidden=False,bNotConnectable=False,bDefaultValueIsReadOnly=False,bDefaultValueIsIgnored=False,bAdvancedView=False,bOrphanedPin=False,)
   CustomProperties Pin (PinId=0963DDC341D4BA996B36D3A89F198A5F,PinName="texture",PinToolTip="Texture
Texture Object Reference",PinType.PinCategory="object",PinType.PinSubCategory="",PinType.PinSubCategoryObject="/Script/CoreUObject.Class'/Script/Engine.Texture'",PinType.PinSubCategoryMemberReference=(),PinType.PinValueType=(),PinType.ContainerType=None,PinType.bIsReference=False,PinType.bIsConst=False,PinType.bIsWeakPointer=False,PinType.bIsUObjectWrapper=False,PinType.bSerializeAsSinglePrecisionFloat=False,LinkedTo=(K2Node_GetArrayItem_6 979ABEDA4A0CF920472A058F403CA891,),PersistentGuid=00000000000000000000000000000000,bHidden=False,bNotConnectable=False,bDefaultValueIsReadOnly=False,bDefaultValueIsIgnored=False,bAdvancedView=False,bOrphanedPin=False,)
   CustomProperties Pin (PinId=52D2CFFE4F829289CDEEFF8A323A1211,PinName="tonemap",PinToolTip="Tonemap
Boolean",PinType.PinCategory="bool",PinType.PinSubCategory="",PinType.PinSubCategoryObject=None,PinType.PinSubCategoryMemberReference=(),PinType.PinValueType=(),PinType.ContainerType=None,PinType.bIsReference=False,PinType.bIsConst=False,PinType.bIsWeakPointer=False,PinType.bIsUObjectWrapper=False,PinType.bSerializeAsSinglePrecisionFloat=False,DefaultValue="false",AutogeneratedDefaultValue="false",PersistentGuid=00000000000000000000000000000000,bHidden=False,bNotConnectable=False,bDefaultValueIsReadOnly=False,bDefaultValueIsIgnored=False,bAdvancedView=False,bOrphanedPin=False,)
   CustomProperties Pin (PinId=4DCA3D894200A4BDC1124EB80F681C15,PinName="out_nits",PinToolTip="Out Nits
Integer",PinType.PinCategory="int",PinType.PinSubCategory="",PinType.PinSubCategoryObject=None,PinType.PinSubCategoryMemberReference=(),PinType.PinValueType=(),PinType.ContainerType=None,PinType.bIsReference=False,PinType.bIsConst=False,PinType.bIsWeakPointer=False,PinType.bIsUObjectWrapper=False,PinType.bSerializeAsSinglePrecisionFloat=False,DefaultValue="10000",AutogeneratedDefaultValue="10000",PersistentGuid=00000000000000000000000000000000,bHidden=False,bNotConnectable=False,bDefaultValueIsReadOnly=False,bDefaultValueIsIgnored=False,bAdvancedView=False,bOrphanedPin=False,)
   CustomProperties Pin (PinId=01C8AE4B40520E9B38C3A9A8414605E4,PinName="alpha",PinToolTip="Alpha
Float (single-precision)",PinType.PinCategory="real",PinType.PinSubCategory="float",PinType.PinSubCategoryObject=None,PinType.PinSubCategoryMemberReference=(),PinType.PinValueType=(),PinType.ContainerType=None,PinType.bIsReference=False,PinType.bIsConst=False,PinType.bIsWeakPointer=False,PinType.bIsUObjectWrapper=False,PinType.bSerializeAsSinglePrecisionFloat=False,DefaultValue="1.000000",AutogeneratedDefaultValue="1.000000",PersistentGuid=00000000000000000000000000000000,bHidden=False,bNotConnectable=False,bDefaultValueIsReadOnly=False,bDefaultValueIsIgnored=False,bAdvancedView=False,bOrphanedPin=False,)
   CustomProperties Pin (PinId=432A143F4A021FCCDE8802A5863DA04B,PinName="srgb_decode",PinToolTip="Srgb Decode
Boolean",PinType.PinCategory="bool",PinType.PinSubCategory="",PinType.PinSubCategoryObject=None,PinType.PinSubCategoryMemberReference=(),PinType.PinValueType=(),PinType.ContainerType=None,PinType.bIsReference=False,PinType.bIsConst=False,PinType.bIsWeakPointer=False,PinType.bIsUObjectWrapper=False,PinType.bSerializeAsSinglePrecisionFloat=False,DefaultValue="false",AutogeneratedDefaultValue="false",PersistentGuid=00000000000000000000000000000000,bHidden=False,bNotConnectable=False,bDefaultValueIsReadOnly=False,bDefaultValueIsIgnored=False,bAdvancedView=False,bOrphanedPin=False,)
   CustomProperties Pin (PinId=80F39BD34C58EC65E6E5ECBE4FCA474C,PinName="hdr",PinToolTip="Hdr
Boolean",PinType.PinCategory="bool",PinType.PinSubCategory="",PinType.PinSubCategoryObject=None,PinType.PinSubCategoryMemberReference=(),PinType.PinValueType=(),PinType.ContainerType=None,PinType.bIsReference=False,PinType.bIsConst=False,PinType.bIsWeakPointer=False,PinType.bIsUObjectWrapper=False,PinType.bSerializeAsSinglePrecisionFloat=False,DefaultValue="false",AutogeneratedDefaultValue="false",PersistentGuid=00000000000000000000000000000000,bHidden=False,bNotConnectable=False,bDefaultValueIsReadOnly=False,bDefaultValueIsIgnored=False,bAdvancedView=False,bOrphanedPin=False,)
End Object
Begin Object Class=/Script/BlueprintGraph.K2Node_VariableGet Name="K2Node_VariableGet_11" ExportPath="/Script/BlueprintGraph.K2Node_VariableGet'/Game/Blueprints/VideoHUD.VideoHUD:EventGraph.K2Node_VariableGet_11'"
   VariableReference=(MemberName="Textures",MemberGuid=49AF56964895DE554A271DB68412C1C5,bSelfContext=True)
   NodePosX=-864
   NodePosY=1360
   NodeGuid=7C1BBE544258235D444226A740078059
   CustomProperties Pin (PinId=60A3038E417F4E9AA8643C9366246ACF,PinName="Textures",Direction="EGPD_Output",PinType.PinCategory="object",PinType.PinSubCategory="",PinType.PinSubCategoryObject="/Script/CoreUObject.Class'/Script/Engine.TextureRenderTarget'",PinType.PinSubCategoryMemberReference=(),PinType.PinValueType=(),PinType.ContainerType=Array,PinType.bIsReference=False,PinType.bIsConst=False,PinType.bIsWeakPointer=False,PinType.bIsUObjectWrapper=False,PinType.bSerializeAsSinglePrecisionFloat=False,LinkedTo=(K2Node_GetArrayItem_6 469D2C474F9590ECC8ED3184F713CCD3,),PersistentGuid=00000000000000000000000000000000,bHidden=False,bNotConnectable=False,bDefaultValueIsReadOnly=False,bDefaultValueIsIgnored=False,bAdvancedView=False,bOrphanedPin=False,)
   CustomProperties Pin (PinId=597694FD4C4A09F646AE67A3ACD6DD30,PinName="self",PinFriendlyName=NSLOCTEXT("K2Node", "Target", "Target"),PinType.PinCategory="object",PinType.PinSubCategory="",PinType.PinSubCategoryObject="/Script/Engine.BlueprintGeneratedClass'/Game/Blueprints/VideoHUD.VideoHUD_C'",PinType.PinSubCategoryMemberReference=(),PinType.PinValueType=(),PinType.ContainerType=None,PinType.bIsReference=False,PinType.bIsConst=False,PinType.bIsWeakPointer=False,PinType.bIsUObjectWrapper=False,PinType.bSerializeAsSinglePrecisionFloat=False,PersistentGuid=00000000000000000000000000000000,bHidden=True,bNotConnectable=False,bDefaultValueIsReadOnly=False,bDefaultValueIsIgnored=False,bAdvancedView=False,bOrphanedPin=False,)
End Object
Begin Object Class=/Script/BlueprintGraph.K2Node_GetArrayItem Name="K2Node_GetArrayItem_6" ExportPath="/Script/BlueprintGraph.K2Node_GetArrayItem'/Game/Blueprints/VideoHUD.VideoHUD:EventGraph.K2Node_GetArrayItem_6'"
   bReturnByRefDesired=False
   NodePosX=-704
   NodePosY=1296
   NodeGuid=C112F4844DFCB331CD0427AF0B5B02DD
   CustomProperties Pin (PinId=469D2C474F9590ECC8ED3184F713CCD3,PinName="Array",PinType.PinCategory="object",PinType.PinSubCategory="",PinType.PinSubCategoryObject="/Script/CoreUObject.Class'/Script/Engine.TextureRenderTarget'",PinType.PinSubCategoryMemberReference=(),PinType.PinValueType=(),PinType.ContainerType=Array,PinType.bIsReference=False,PinType.bIsConst=False,PinType.bIsWeakPointer=False,PinType.bIsUObjectWrapper=False,PinType.bSerializeAsSinglePrecisionFloat=False,LinkedTo=(K2Node_VariableGet_11 60A3038E417F4E9AA8643C9366246ACF,),PersistentGuid=00000000000000000000000000000000,bHidden=False,bNotConnectable=False,bDefaultValueIsReadOnly=False,bDefaultValueIsIgnored=False,bAdvancedView=False,bOrphanedPin=False,)
   CustomProperties Pin (PinId=D86B1A1D474D4594A07E779BF54E52E4,PinName="Dimension 1",PinType.PinCategory="int",PinType.PinSubCategory="",PinType.PinSubCategoryObject=None,PinType.PinSubCategoryMemberReference=(),PinType.PinValueType=(),PinType.ContainerType=None,PinType.bIsReference=False,PinType.bIsConst=False,PinType.bIsWeakPointer=False,PinType.bIsUObjectWrapper=False,PinType.bSerializeAsSinglePrecisionFloat=False,DefaultValue="0",AutogeneratedDefaultValue="0",LinkedTo=(K2Node_MacroInstance_4 D26D252244006654583C5FB504D73542,),PersistentGuid=00000000000000000000000000000000,bHidden=False,bNotConnectable=False,bDefaultValueIsReadOnly=False,bDefaultValueIsIgnored=False,bAdvancedView=False,bOrphanedPin=False,)
   CustomProperties Pin (PinId=979ABEDA4A0CF920472A058F403CA891,PinName="Output",Direction="EGPD_Output",PinType.PinCategory="object",PinType.PinSubCategory="",PinType.PinSubCategoryObject="/Script/CoreUObject.Class'/Script/Engine.TextureRenderTarget'",PinType.PinSubCategoryMemberReference=(),PinType.PinValueType=(),PinType.ContainerType=None,PinType.bIsReference=False,PinType.bIsConst=False,PinType.bIsWeakPointer=False,PinType.bIsUObjectWrapper=False,PinType.bSerializeAsSinglePrecisionFloat=False,LinkedTo=(K2Node_CallFunction_33 0963DDC341D4BA996B36D3A89F198A5F,),PersistentGuid=00000000000000000000000000000000,bHidden=False,bNotConnectable=False,bDefaultValueIsReadOnly=False,bDefaultValueIsIgnored=False,bAdvancedView=False,bOrphanedPin=False,)
End Object
Begin Object Class=/Script/BlueprintGraph.K2Node_IfThenElse Name="K2Node_IfThenElse_0" ExportPath="/Script/BlueprintGraph.K2Node_IfThenElse'/Game/Blueprints/VideoHUD.VideoHUD:EventGraph.K2Node_IfThenElse_0'"
   NodePosX=144
   NodePosY=1200
   NodeGuid=D45FE0314B75884FDC7A159DA2BB5A02
   CustomProperties Pin (PinId=32F8B4574ADAA3E5453A89B85AF3B19D,PinName="execute",PinType.PinCategory="exec",PinType.PinSubCategory="",PinType.PinSubCategoryObject=None,PinType.PinSubCategoryMemberReference=(),PinType.PinValueType=(),PinType.ContainerType=None,PinType.bIsReference=False,PinType.bIsConst=False,PinType.bIsWeakPointer=False,PinType.bIsUObjectWrapper=False,PinType.bSerializeAsSinglePrecisionFloat=False,LinkedTo=(K2Node_CallFunction_33 3DF1141248F994D9263F5AA447401FD1,),PersistentGuid=00000000000000000000000000000000,bHidden=False,bNotConnectable=False,bDefaultValueIsReadOnly=False,bDefaultValueIsIgnored=False,bAdvancedView=False,bOrphanedPin=False,)
   CustomProperties Pin (PinId=98984ADF473875F647435B8029827C23,PinName="Condition",PinType.PinCategory="bool",PinType.PinSubCategory="",PinType.PinSubCategoryObject=None,PinType.PinSubCategoryMemberReference=(),PinType.PinValueType=(),PinType.ContainerType=None,PinType.bIsReference=False,PinType.bIsConst=False,PinType.bIsWeakPointer=False,PinType.bIsUObjectWrapper=False,PinType.bSerializeAsSinglePrecisionFloat=False,DefaultValue="true",AutogeneratedDefaultValue="true",LinkedTo=(K2Node_GetArrayItem_4 053B7305483CD271F467FC9383B4043B,),PersistentGuid=00000000000000000000000000000000,bHidden=False,bNotConnectable=False,bDefaultValueIsReadOnly=False,bDefaultValueIsIgnored=False,bAdvancedView=False,bOrphanedPin=False,)
   CustomProperties Pin (PinId=2DEA72FC4672CB3640CB53B33A2436F8,PinName="then",PinFriendlyName=NSLOCTEXT("K2Node", "true", "true"),Direction="EGPD_Output",PinType.PinCategory="exec",PinType.PinSubCategory="",PinType.PinSubCategoryObject=None,PinType.PinSubCategoryMemberReference=(),PinType.PinValueType=(),PinType.ContainerType=None,PinType.bIsReference=False,PinType.bIsConst=False,PinType.bIsWeakPointer=False,PinType.bIsUObjectWrapper=False,PinType.bSerializeAsSinglePrecisionFloat=False,LinkedTo=(K2Node_CallFunction_23 3DB87FDE44C866701B94EEBBADEA6A6C,),PersistentGuid=00000000000000000000000000000000,bHidden=False,bNotConnectable=False,bDefaultValueIsReadOnly=False,bDefaultValueIsIgnored=False,bAdvancedView=False,bOrphanedPin=False,)
   CustomProperties Pin (PinId=6FD11A5045C51E54F3EE40A044167E11,PinName="else",PinFriendlyName=NSLOCTEXT("K2Node", "false", "false"),Direction="EGPD_Output",PinType.PinCategory="exec",PinType.PinSubCategory="",PinType.PinSubCategoryObject=None,PinType.PinSubCategoryMemberReference=(),PinType.PinValueType=(),PinType.ContainerType=None,PinType.bIsReference=False,PinType.bIsConst=False,PinType.bIsWeakPointer=False,PinType.bIsUObjectWrapper=False,PinType.bSerializeAsSinglePrecisionFloat=False,LinkedTo=(K2Node_CallFunction_34 CAFDA8CD474C5B54B215DF8AF61A0CF2,),PersistentGuid=00000000000000000000000000000000,bHidden=False,bNotConnectable=False,bDefaultValueIsReadOnly=False,bDefaultValueIsIgnored=False,bAdvancedView=False,bOrphanedPin=False,)
End Object
Begin Object Class=/Script/BlueprintGraph.K2Node_VariableGet Name="K2Node_VariableGet_6" ExportPath="/Script/BlueprintGraph.K2Node_VariableGet'/Game/Blueprints/VideoHUD.VideoHUD:EventGraph.K2Node_VariableGet_6'"
   VariableReference=(MemberName="hoveredState",MemberGuid=311D6FC2486C9B19B59FB8816A2BE743,bSelfContext=True)
   NodePosX=-240
   NodePosY=1344
   NodeGuid=53C583B94065AFCD31D208902CD796E8
   CustomProperties Pin (PinId=A6630F6144725A1B9417188B17CB153B,PinName="hoveredState",Direction="EGPD_Output",PinType.PinCategory="bool",PinType.PinSubCategory="",PinType.PinSubCategoryObject=None,PinType.PinSubCategoryMemberReference=(),PinType.PinValueType=(),PinType.ContainerType=Array,PinType.bIsReference=False,PinType.bIsConst=False,PinType.bIsWeakPointer=False,PinType.bIsUObjectWrapper=False,PinType.bSerializeAsSinglePrecisionFloat=False,LinkedTo=(K2Node_GetArrayItem_4 F781522940ACC0E1CB602187A21621FA,),PersistentGuid=00000000000000000000000000000000,bHidden=False,bNotConnectable=False,bDefaultValueIsReadOnly=False,bDefaultValueIsIgnored=False,bAdvancedView=False,bOrphanedPin=False,)
   CustomProperties Pin (PinId=62BF0F124CE14690204E8D8244D6EFC1,PinName="self",PinFriendlyName=NSLOCTEXT("K2Node", "Target", "Target"),PinType.PinCategory="object",PinType.PinSubCategory="",PinType.PinSubCategoryObject="/Script/Engine.BlueprintGeneratedClass'/Game/Blueprints/VideoHUD.VideoHUD_C'",PinType.PinSubCategoryMemberReference=(),PinType.PinValueType=(),PinType.ContainerType=None,PinType.bIsReference=False,PinType.bIsConst=False,PinType.bIsWeakPointer=False,PinType.bIsUObjectWrapper=False,PinType.bSerializeAsSinglePrecisionFloat=False,PersistentGuid=00000000000000000000000000000000,bHidden=True,bNotConnectable=False,bDefaultValueIsReadOnly=False,bDefaultValueIsIgnored=False,bAdvancedView=False,bOrphanedPin=False,)
End Object
Begin Object Class=/Script/BlueprintGraph.K2Node_Knot Name="K2Node_Knot_9" ExportPath="/Script/BlueprintGraph.K2Node_Knot'/Game/Blueprints/VideoHUD.VideoHUD:EventGraph.K2Node_Knot_9'"
   NodePosX=-928
   NodePosY=1552
   NodeGuid=B178F0DF400DBFE401E671914B904A23
   CustomProperties Pin (PinId=A5191868458EC4CFAB22FF8771F67FA9,PinName="InputPin",PinType.PinCategory="int",PinType.PinSubCategory="",PinType.PinSubCategoryObject=None,PinType.PinSubCategoryMemberReference=(),PinType.PinValueType=(),PinType.ContainerType=None,PinType.bIsReference=False,PinType.bIsConst=False,PinType.bIsWeakPointer=False,PinType.bIsUObjectWrapper=False,PinType.bSerializeAsSinglePrecisionFloat=False,LinkedTo=(K2Node_MacroInstance_4 D26D252244006654583C5FB504D73542,),PersistentGuid=00000000000000000000000000000000,bHidden=False,bNotConnectable=False,bDefaultValueIsReadOnly=False,bDefaultValueIsIgnored=True,bAdvancedView=False,bOrphanedPin=False,)
   CustomProperties Pin (PinId=B53A70864390CA04E286BC91D2547FF7,PinName="OutputPin",Direction="EGPD_Output",PinType.PinCategory="int",PinType.PinSubCategory="",PinType.PinSubCategoryObject=None,PinType.PinSubCategoryMemberReference=(),PinType.PinValueType=(),PinType.ContainerType=None,PinType.bIsReference=False,PinType.bIsConst=False,PinType.bIsWeakPointer=False,PinType.bIsUObjectWrapper=False,PinType.bSerializeAsSinglePrecisionFloat=False,LinkedTo=(K2Node_Knot_10 7FF303B2436EEF8352BD95A0F1AC64BD,),PersistentGuid=00000000000000000000000000000000,bHidden=False,bNotConnectable=False,bDefaultValueIsReadOnly=False,bDefaultValueIsIgnored=False,bAdvancedView=False,bOrphanedPin=False,)
End Object
Begin Object Class=/Script/BlueprintGraph.K2Node_Knot Name="K2Node_Knot_10" ExportPath="/Script/BlueprintGraph.K2Node_Knot'/Game/Blueprints/VideoHUD.VideoHUD:EventGraph.K2Node_Knot_10'"
   NodePosX=-144
   NodePosY=1552
   NodeGuid=0790F911445AF88BF00F6CAD60062CE8
   CustomProperties Pin (PinId=7FF303B2436EEF8352BD95A0F1AC64BD,PinName="InputPin",PinType.PinCategory="int",PinType.PinSubCategory="",PinType.PinSubCategoryObject=None,PinType.PinSubCategoryMemberReference=(),PinType.PinValueType=(),PinType.ContainerType=None,PinType.bIsReference=False,PinType.bIsConst=False,PinType.bIsWeakPointer=False,PinType.bIsUObjectWrapper=False,PinType.bSerializeAsSinglePrecisionFloat=False,LinkedTo=(K2Node_Knot_9 B53A70864390CA04E286BC91D2547FF7,),PersistentGuid=00000000000000000000000000000000,bHidden=False,bNotConnectable=False,bDefaultValueIsReadOnly=False,bDefaultValueIsIgnored=True,bAdvancedView=False,bOrphanedPin=False,)
   CustomProperties Pin (PinId=541710764A30B727DF147E8C42C8E7A3,PinName="OutputPin",Direction="EGPD_Output",PinType.PinCategory="int",PinType.PinSubCategory="",PinType.PinSubCategoryObject=None,PinType.PinSubCategoryMemberReference=(),PinType.PinValueType=(),PinType.ContainerType=None,PinType.bIsReference=False,PinType.bIsConst=False,PinType.bIsWeakPointer=False,PinType.bIsUObjectWrapper=False,PinType.bSerializeAsSinglePrecisionFloat=False,LinkedTo=(K2Node_GetArrayItem_4 E0EC0D6340DFD0EAAFB24A98AE0614ED,),PersistentGuid=00000000000000000000000000000000,bHidden=False,bNotConnectable=False,bDefaultValueIsReadOnly=False,bDefaultValueIsIgnored=False,bAdvancedView=False,bOrphanedPin=False,)
End Object
Begin Object Class=/Script/BlueprintGraph.K2Node_Knot Name="K2Node_Knot_11" ExportPath="/Script/BlueprintGraph.K2Node_Knot'/Game/Blueprints/VideoHUD.VideoHUD:EventGraph.K2Node_Knot_11'"
   NodePosX=-928
   NodePosY=1600
   NodeGuid=606521F84A72D477D2B54095FDEF4E10
   CustomProperties Pin (PinId=D61DD5154FACC0300213CB9888B0E0AA,PinName="InputPin",PinType.PinCategory="object",PinType.PinSubCategory="",PinType.PinSubCategoryObject="/Script/CoreUObject.Class'/Script/BinkMediaPlayer.BinkMediaPlayer'",PinType.PinSubCategoryMemberReference=(),PinType.PinValueType=(),PinType.ContainerType=None,PinType.bIsReference=False,PinType.bIsConst=False,PinType.bIsWeakPointer=False,PinType.bIsUObjectWrapper=False,PinType.bSerializeAsSinglePrecisionFloat=False,LinkedTo=(K2Node_MacroInstance_4 D0A8DAD041D4BA0B9D47AD97D6946BC3,),PersistentGuid=00000000000000000000000000000000,bHidden=False,bNotConnectable=False,bDefaultValueIsReadOnly=False,bDefaultValueIsIgnored=True,bAdvancedView=False,bOrphanedPin=False,)
   CustomProperties Pin (PinId=5C34E533402FB1135B8025BEE986869C,PinName="OutputPin",Direction="EGPD_Output",PinType.PinCategory="object",PinType.PinSubCategory="",PinType.PinSubCategoryObject="/Script/CoreUObject.Class'/Script/BinkMediaPlayer.BinkMediaPlayer'",PinType.PinSubCategoryMemberReference=(),PinType.PinValueType=(),PinType.ContainerType=None,PinType.bIsReference=False,PinType.bIsConst=False,PinType.bIsWeakPointer=False,PinType.bIsUObjectWrapper=False,PinType.bSerializeAsSinglePrecisionFloat=False,LinkedTo=(K2Node_Knot_12 5CB149F1485ADC9378EA8E914FF0CBC9,),PersistentGuid=00000000000000000000000000000000,bHidden=False,bNotConnectable=False,bDefaultValueIsReadOnly=False,bDefaultValueIsIgnored=False,bAdvancedView=False,bOrphanedPin=False,)
End Object
Begin Object Class=/Script/BlueprintGraph.K2Node_Knot Name="K2Node_Knot_12" ExportPath="/Script/BlueprintGraph.K2Node_Knot'/Game/Blueprints/VideoHUD.VideoHUD:EventGraph.K2Node_Knot_12'"
   NodePosX=240
   NodePosY=1600
   NodeGuid=D88C33764211B2E2897A3EB46AA181A8
   CustomProperties Pin (PinId=5CB149F1485ADC9378EA8E914FF0CBC9,PinName="InputPin",PinType.PinCategory="object",PinType.PinSubCategory="",PinType.PinSubCategoryObject="/Script/CoreUObject.Class'/Script/BinkMediaPlayer.BinkMediaPlayer'",PinType.PinSubCategoryMemberReference=(),PinType.PinValueType=(),PinType.ContainerType=None,PinType.bIsReference=False,PinType.bIsConst=False,PinType.bIsWeakPointer=False,PinType.bIsUObjectWrapper=False,PinType.bSerializeAsSinglePrecisionFloat=False,LinkedTo=(K2Node_Knot_11 5C34E533402FB1135B8025BEE986869C,),PersistentGuid=00000000000000000000000000000000,bHidden=False,bNotConnectable=False,bDefaultValueIsReadOnly=False,bDefaultValueIsIgnored=True,bAdvancedView=False,bOrphanedPin=False,)
   CustomProperties Pin (PinId=66B5128049F40FF8FD43F99424426C12,PinName="OutputPin",Direction="EGPD_Output",PinType.PinCategory="object",PinType.PinSubCategory="",PinType.PinSubCategoryObject="/Script/CoreUObject.Class'/Script/BinkMediaPlayer.BinkMediaPlayer'",PinType.PinSubCategoryMemberReference=(),PinType.PinValueType=(),PinType.ContainerType=None,PinType.bIsReference=False,PinType.bIsConst=False,PinType.bIsWeakPointer=False,PinType.bIsUObjectWrapper=False,PinType.bSerializeAsSinglePrecisionFloat=False,LinkedTo=(K2Node_Knot_13 521B6D03419CC0D55872FE80DE6A99F7,K2Node_Knot_14 FF198E74478D4890E96D09B2F791C0A1,K2Node_Knot_15 1994C51943CA84D1943600B701EABC37,),PersistentGuid=00000000000000000000000000000000,bHidden=False,bNotConnectable=False,bDefaultValueIsReadOnly=False,bDefaultValueIsIgnored=False,bAdvancedView=False,bOrphanedPin=False,)
End Object
Begin Object Class=/Script/BlueprintGraph.K2Node_CallFunction Name="K2Node_CallFunction_23" ExportPath="/Script/BlueprintGraph.K2Node_CallFunction'/Game/Blueprints/VideoHUD.VideoHUD:EventGraph.K2Node_CallFunction_23'"
   FunctionReference=(MemberParent="/Script/CoreUObject.Class'/Script/BinkMediaPlayer.BinkMediaPlayer'",MemberName="Play")
   NodePosX=544
   NodePosY=1168
   NodeGuid=DB14A95F465031CC196555AB862B1591
   CustomProperties Pin (PinId=3DB87FDE44C866701B94EEBBADEA6A6C,PinName="execute",PinType.PinCategory="exec",PinType.PinSubCategory="",PinType.PinSubCategoryObject=None,PinType.PinSubCategoryMemberReference=(),PinType.PinValueType=(),PinType.ContainerType=None,PinType.bIsReference=False,PinType.bIsConst=False,PinType.bIsWeakPointer=False,PinType.bIsUObjectWrapper=False,PinType.bSerializeAsSinglePrecisionFloat=False,LinkedTo=(K2Node_IfThenElse_0 2DEA72FC4672CB3640CB53B33A2436F8,),PersistentGuid=00000000000000000000000000000000,bHidden=False,bNotConnectable=False,bDefaultValueIsReadOnly=False,bDefaultValueIsIgnored=False,bAdvancedView=False,bOrphanedPin=False,)
   CustomProperties Pin (PinId=693C434A452C7BD11470D993DB4EFF73,PinName="then",Direction="EGPD_Output",PinType.PinCategory="exec",PinType.PinSubCategory="",PinType.PinSubCategoryObject=None,PinType.PinSubCategoryMemberReference=(),PinType.PinValueType=(),PinType.ContainerType=None,PinType.bIsReference=False,PinType.bIsConst=False,PinType.bIsWeakPointer=False,PinType.bIsUObjectWrapper=False,PinType.bSerializeAsSinglePrecisionFloat=False,PersistentGuid=00000000000000000000000000000000,bHidden=False,bNotConnectable=False,bDefaultValueIsReadOnly=False,bDefaultValueIsIgnored=False,bAdvancedView=False,bOrphanedPin=False,)
   CustomProperties Pin (PinId=A2D9C65D4227C187C8BC89A8A5DF3386,PinName="self",PinFriendlyName=NSLOCTEXT("K2Node", "Target", "Target"),PinType.PinCategory="object",PinType.PinSubCategory="",PinType.PinSubCategoryObject="/Script/CoreUObject.Class'/Script/BinkMediaPlayer.BinkMediaPlayer'",PinType.PinSubCategoryMemberReference=(),PinType.PinValueType=(),PinType.ContainerType=None,PinType.bIsReference=False,PinType.bIsConst=False,PinType.bIsWeakPointer=False,PinType.bIsUObjectWrapper=False,PinType.bSerializeAsSinglePrecisionFloat=False,LinkedTo=(K2Node_Knot_13 F9ADA3BA4763F5C51995D49E9A682C67,),PersistentGuid=00000000000000000000000000000000,bHidden=False,bNotConnectable=False,bDefaultValueIsReadOnly=False,bDefaultValueIsIgnored=False,bAdvancedView=False,bOrphanedPin=False,)
   CustomProperties Pin (PinId=DA5952534FFDD3E4C93CB69BAAE8A244,PinName="ReturnValue",Direction="EGPD_Output",PinType.PinCategory="bool",PinType.PinSubCategory="",PinType.PinSubCategoryObject=None,PinType.PinSubCategoryMemberReference=(),PinType.PinValueType=(),PinType.ContainerType=None,PinType.bIsReference=False,PinType.bIsConst=False,PinType.bIsWeakPointer=False,PinType.bIsUObjectWrapper=False,PinType.bSerializeAsSinglePrecisionFloat=False,DefaultValue="false",AutogeneratedDefaultValue="false",PersistentGuid=00000000000000000000000000000000,bHidden=False,bNotConnectable=False,bDefaultValueIsReadOnly=False,bDefaultValueIsIgnored=False,bAdvancedView=False,bOrphanedPin=False,)
End Object
Begin Object Class=/Script/BlueprintGraph.K2Node_CallFunction Name="K2Node_CallFunction_34" ExportPath="/Script/BlueprintGraph.K2Node_CallFunction'/Game/Blueprints/VideoHUD.VideoHUD:EventGraph.K2Node_CallFunction_34'"
   FunctionReference=(MemberParent="/Script/CoreUObject.Class'/Script/BinkMediaPlayer.BinkMediaPlayer'",MemberName="Pause")
   NodePosX=544
   NodePosY=1312
   NodeGuid=343E28FC49493357E31B98B404F5CAA0
   CustomProperties Pin (PinId=CAFDA8CD474C5B54B215DF8AF61A0CF2,PinName="execute",PinType.PinCategory="exec",PinType.PinSubCategory="",PinType.PinSubCategoryObject=None,PinType.PinSubCategoryMemberReference=(),PinType.PinValueType=(),PinType.ContainerType=None,PinType.bIsReference=False,PinType.bIsConst=False,PinType.bIsWeakPointer=False,PinType.bIsUObjectWrapper=False,PinType.bSerializeAsSinglePrecisionFloat=False,LinkedTo=(K2Node_IfThenElse_0 6FD11A5045C51E54F3EE40A044167E11,),PersistentGuid=00000000000000000000000000000000,bHidden=False,bNotConnectable=False,bDefaultValueIsReadOnly=False,bDefaultValueIsIgnored=False,bAdvancedView=False,bOrphanedPin=False,)
   CustomProperties Pin (PinId=AD8296D34996692418EB06ADE29C7E6E,PinName="then",Direction="EGPD_Output",PinType.PinCategory="exec",PinType.PinSubCategory="",PinType.PinSubCategoryObject=None,PinType.PinSubCategoryMemberReference=(),PinType.PinValueType=(),PinType.ContainerType=None,PinType.bIsReference=False,PinType.bIsConst=False,PinType.bIsWeakPointer=False,PinType.bIsUObjectWrapper=False,PinType.bSerializeAsSinglePrecisionFloat=False,LinkedTo=(K2Node_CallFunction_25 D99FC7B24DF289C071484697FD35D751,),PersistentGuid=00000000000000000000000000000000,bHidden=False,bNotConnectable=False,bDefaultValueIsReadOnly=False,bDefaultValueIsIgnored=False,bAdvancedView=False,bOrphanedPin=False,)
   CustomProperties Pin (PinId=1B3FD3B24E1FF30080BF93A6ABF8CA7B,PinName="self",PinFriendlyName=NSLOCTEXT("K2Node", "Target", "Target"),PinType.PinCategory="object",PinType.PinSubCategory="",PinType.PinSubCategoryObject="/Script/CoreUObject.Class'/Script/BinkMediaPlayer.BinkMediaPlayer'",PinType.PinSubCategoryMemberReference=(),PinType.PinValueType=(),PinType.ContainerType=None,PinType.bIsReference=False,PinType.bIsConst=False,PinType.bIsWeakPointer=False,PinType.bIsUObjectWrapper=False,PinType.bSerializeAsSinglePrecisionFloat=False,LinkedTo=(K2Node_Knot_14 4F8F11A4411A69E86499F592BA18BE01,),PersistentGuid=00000000000000000000000000000000,bHidden=False,bNotConnectable=False,bDefaultValueIsReadOnly=False,bDefaultValueIsIgnored=False,bAdvancedView=False,bOrphanedPin=False,)
   CustomProperties Pin (PinId=053EEDCE45128CCD8DAA9791E7FA4878,PinName="ReturnValue",Direction="EGPD_Output",PinType.PinCategory="bool",PinType.PinSubCategory="",PinType.PinSubCategoryObject=None,PinType.PinSubCategoryMemberReference=(),PinType.PinValueType=(),PinType.ContainerType=None,PinType.bIsReference=False,PinType.bIsConst=False,PinType.bIsWeakPointer=False,PinType.bIsUObjectWrapper=False,PinType.bSerializeAsSinglePrecisionFloat=False,DefaultValue="false",AutogeneratedDefaultValue="false",PersistentGuid=00000000000000000000000000000000,bHidden=False,bNotConnectable=False,bDefaultValueIsReadOnly=False,bDefaultValueIsIgnored=False,bAdvancedView=False,bOrphanedPin=False,)
End Object
Begin Object Class=/Script/BlueprintGraph.K2Node_Knot Name="K2Node_Knot_13" ExportPath="/Script/BlueprintGraph.K2Node_Knot'/Game/Blueprints/VideoHUD.VideoHUD:EventGraph.K2Node_Knot_13'"
   NodePosX=384
   NodePosY=1248
   NodeGuid=69E1D412445A40985663869E73F2B770
   CustomProperties Pin (PinId=521B6D03419CC0D55872FE80DE6A99F7,PinName="InputPin",PinType.PinCategory="object",PinType.PinSubCategory="",PinType.PinSubCategoryObject="/Script/CoreUObject.Class'/Script/BinkMediaPlayer.BinkMediaPlayer'",PinType.PinSubCategoryMemberReference=(),PinType.PinValueType=(),PinType.ContainerType=None,PinType.bIsReference=False,PinType.bIsConst=False,PinType.bIsWeakPointer=False,PinType.bIsUObjectWrapper=False,PinType.bSerializeAsSinglePrecisionFloat=False,LinkedTo=(K2Node_Knot_12 66B5128049F40FF8FD43F99424426C12,),PersistentGuid=00000000000000000000000000000000,bHidden=False,bNotConnectable=False,bDefaultValueIsReadOnly=False,bDefaultValueIsIgnored=True,bAdvancedView=False,bOrphanedPin=False,)
   CustomProperties Pin (PinId=F9ADA3BA4763F5C51995D49E9A682C67,PinName="OutputPin",Direction="EGPD_Output",PinType.PinCategory="object",PinType.PinSubCategory="",PinType.PinSubCategoryObject="/Script/CoreUObject.Class'/Script/BinkMediaPlayer.BinkMediaPlayer'",PinType.PinSubCategoryMemberReference=(),PinType.PinValueType=(),PinType.ContainerType=None,PinType.bIsReference=False,PinType.bIsConst=False,PinType.bIsWeakPointer=False,PinType.bIsUObjectWrapper=False,PinType.bSerializeAsSinglePrecisionFloat=False,LinkedTo=(K2Node_CallFunction_23 A2D9C65D4227C187C8BC89A8A5DF3386,),PersistentGuid=00000000000000000000000000000000,bHidden=False,bNotConnectable=False,bDefaultValueIsReadOnly=False,bDefaultValueIsIgnored=False,bAdvancedView=False,bOrphanedPin=False,)
End Object
Begin Object Class=/Script/BlueprintGraph.K2Node_Knot Name="K2Node_Knot_14" ExportPath="/Script/BlueprintGraph.K2Node_Knot'/Game/Blueprints/VideoHUD.VideoHUD:EventGraph.K2Node_Knot_14'"
   NodePosX=384
   NodePosY=1376
   NodeGuid=987A3C1D47293D9B5882828B1997C68C
   CustomProperties Pin (PinId=FF198E74478D4890E96D09B2F791C0A1,PinName="InputPin",PinType.PinCategory="object",PinType.PinSubCategory="",PinType.PinSubCategoryObject="/Script/CoreUObject.Class'/Script/BinkMediaPlayer.BinkMediaPlayer'",PinType.PinSubCategoryMemberReference=(),PinType.PinValueType=(),PinType.ContainerType=None,PinType.bIsReference=False,PinType.bIsConst=False,PinType.bIsWeakPointer=False,PinType.bIsUObjectWrapper=False,PinType.bSerializeAsSinglePrecisionFloat=False,LinkedTo=(K2Node_Knot_12 66B5128049F40FF8FD43F99424426C12,),PersistentGuid=00000000000000000000000000000000,bHidden=False,bNotConnectable=False,bDefaultValueIsReadOnly=False,bDefaultValueIsIgnored=True,bAdvancedView=False,bOrphanedPin=False,)
   CustomProperties Pin (PinId=4F8F11A4411A69E86499F592BA18BE01,PinName="OutputPin",Direction="EGPD_Output",PinType.PinCategory="object",PinType.PinSubCategory="",PinType.PinSubCategoryObject="/Script/CoreUObject.Class'/Script/BinkMediaPlayer.BinkMediaPlayer'",PinType.PinSubCategoryMemberReference=(),PinType.PinValueType=(),PinType.ContainerType=None,PinType.bIsReference=False,PinType.bIsConst=False,PinType.bIsWeakPointer=False,PinType.bIsUObjectWrapper=False,PinType.bSerializeAsSinglePrecisionFloat=False,LinkedTo=(K2Node_CallFunction_34 1B3FD3B24E1FF30080BF93A6ABF8CA7B,),PersistentGuid=00000000000000000000000000000000,bHidden=False,bNotConnectable=False,bDefaultValueIsReadOnly=False,bDefaultValueIsIgnored=False,bAdvancedView=False,bOrphanedPin=False,)
End Object
Begin Object Class=/Script/BlueprintGraph.K2Node_GetArrayItem Name="K2Node_GetArrayItem_4" ExportPath="/Script/BlueprintGraph.K2Node_GetArrayItem'/Game/Blueprints/VideoHUD.VideoHUD:EventGraph.K2Node_GetArrayItem_4'"
   NodePosX=-64
   NodePosY=1344
   NodeGuid=193803B94CE574EEDFCF9EACB8A176A4
   CustomProperties Pin (PinId=F781522940ACC0E1CB602187A21621FA,PinName="Array",PinType.PinCategory="bool",PinType.PinSubCategory="",PinType.PinSubCategoryObject=None,PinType.PinSubCategoryMemberReference=(),PinType.PinValueType=(),PinType.ContainerType=Array,PinType.bIsReference=False,PinType.bIsConst=False,PinType.bIsWeakPointer=False,PinType.bIsUObjectWrapper=False,PinType.bSerializeAsSinglePrecisionFloat=False,LinkedTo=(K2Node_VariableGet_6 A6630F6144725A1B9417188B17CB153B,),PersistentGuid=00000000000000000000000000000000,bHidden=False,bNotConnectable=False,bDefaultValueIsReadOnly=False,bDefaultValueIsIgnored=False,bAdvancedView=False,bOrphanedPin=False,)
   CustomProperties Pin (PinId=E0EC0D6340DFD0EAAFB24A98AE0614ED,PinName="Dimension 1",PinType.PinCategory="int",PinType.PinSubCategory="",PinType.PinSubCategoryObject=None,PinType.PinSubCategoryMemberReference=(),PinType.PinValueType=(),PinType.ContainerType=None,PinType.bIsReference=False,PinType.bIsConst=False,PinType.bIsWeakPointer=False,PinType.bIsUObjectWrapper=False,PinType.bSerializeAsSinglePrecisionFloat=False,DefaultValue="0",AutogeneratedDefaultValue="0",LinkedTo=(K2Node_Knot_10 541710764A30B727DF147E8C42C8E7A3,),PersistentGuid=00000000000000000000000000000000,bHidden=False,bNotConnectable=False,bDefaultValueIsReadOnly=False,bDefaultValueIsIgnored=False,bAdvancedView=False,bOrphanedPin=False,)
   CustomProperties Pin (PinId=053B7305483CD271F467FC9383B4043B,PinName="Output",Direction="EGPD_Output",PinType.PinCategory="bool",PinType.PinSubCategory="",PinType.PinSubCategoryObject=None,PinType.PinSubCategoryMemberReference=(),PinType.PinValueType=(),PinType.ContainerType=None,PinType.bIsReference=True,PinType.bIsConst=False,PinType.bIsWeakPointer=False,PinType.bIsUObjectWrapper=False,PinType.bSerializeAsSinglePrecisionFloat=False,LinkedTo=(K2Node_IfThenElse_0 98984ADF473875F647435B8029827C23,),PersistentGuid=00000000000000000000000000000000,bHidden=False,bNotConnectable=False,bDefaultValueIsReadOnly=False,bDefaultValueIsIgnored=False,bAdvancedView=False,bOrphanedPin=False,)
End Object
Begin Object Class=/Script/BlueprintGraph.K2Node_CallFunction Name="K2Node_CallFunction_25" ExportPath="/Script/BlueprintGraph.K2Node_CallFunction'/Game/Blueprints/VideoHUD.VideoHUD:EventGraph.K2Node_CallFunction_25'"
   FunctionReference=(MemberParent="/Script/CoreUObject.Class'/Script/BinkMediaPlayer.BinkMediaPlayer'",MemberName="Seek")
   NodePosX=880
   NodePosY=1312
   NodeGuid=F76D2512485CAA0DBB64568C5ECA64FA
   CustomProperties Pin (PinId=D99FC7B24DF289C071484697FD35D751,PinName="execute",PinToolTip="
Exec",PinType.PinCategory="exec",PinType.PinSubCategory="",PinType.PinSubCategoryObject=None,PinType.PinSubCategoryMemberReference=(),PinType.PinValueType=(),PinType.ContainerType=None,PinType.bIsReference=False,PinType.bIsConst=False,PinType.bIsWeakPointer=False,PinType.bIsUObjectWrapper=False,PinType.bSerializeAsSinglePrecisionFloat=False,LinkedTo=(K2Node_CallFunction_34 AD8296D34996692418EB06ADE29C7E6E,),PersistentGuid=00000000000000000000000000000000,bHidden=False,bNotConnectable=False,bDefaultValueIsReadOnly=False,bDefaultValueIsIgnored=False,bAdvancedView=False,bOrphanedPin=False,)
   CustomProperties Pin (PinId=55C5C3D344F6DAB4F6ADAD912EDBB809,PinName="then",PinToolTip="
Exec",Direction="EGPD_Output",PinType.PinCategory="exec",PinType.PinSubCategory="",PinType.PinSubCategoryObject=None,PinType.PinSubCategoryMemberReference=(),PinType.PinValueType=(),PinType.ContainerType=None,PinType.bIsReference=False,PinType.bIsConst=False,PinType.bIsWeakPointer=False,PinType.bIsUObjectWrapper=False,PinType.bSerializeAsSinglePrecisionFloat=False,PersistentGuid=00000000000000000000000000000000,bHidden=False,bNotConnectable=False,bDefaultValueIsReadOnly=False,bDefaultValueIsIgnored=False,bAdvancedView=False,bOrphanedPin=False,)
   CustomProperties Pin (PinId=21C7DB4444ADA6B4D92C67AC9A471F27,PinName="self",PinFriendlyName=NSLOCTEXT("K2Node", "Target", "Target"),PinToolTip="Target
Bink Media Player Object Reference",PinType.PinCategory="object",PinType.PinSubCategory="",PinType.PinSubCategoryObject="/Script/CoreUObject.Class'/Script/BinkMediaPlayer.BinkMediaPlayer'",PinType.PinSubCategoryMemberReference=(),PinType.PinValueType=(),PinType.ContainerType=None,PinType.bIsReference=False,PinType.bIsConst=False,PinType.bIsWeakPointer=False,PinType.bIsUObjectWrapper=False,PinType.bSerializeAsSinglePrecisionFloat=False,LinkedTo=(K2Node_Knot_15 33A99212418ECF5D0E0356A83C319E64,),PersistentGuid=00000000000000000000000000000000,bHidden=False,bNotConnectable=False,bDefaultValueIsReadOnly=False,bDefaultValueIsIgnored=False,bAdvancedView=False,bOrphanedPin=False,)
   CustomProperties Pin (PinId=3BFE43D6427A723A8578D58201A60DB2,PinName="InTime",PinToolTip="In Time
Timespan Structure (by ref)

The playback time to set.",PinType.PinCategory="struct",PinType.PinSubCategory="",PinType.PinSubCategoryObject="/Script/CoreUObject.ScriptStruct'/Script/CoreUObject.Timespan'",PinType.PinSubCategoryMemberReference=(),PinType.PinValueType=(),PinType.ContainerType=None,PinType.bIsReference=True,PinType.bIsConst=True,PinType.bIsWeakPointer=False,PinType.bIsUObjectWrapper=False,PinType.bSerializeAsSinglePrecisionFloat=False,LinkedTo=(K2Node_VariableGet_7 8D6E0E9A496A52842F621094B83B92A5,),PersistentGuid=00000000000000000000000000000000,bHidden=False,bNotConnectable=False,bDefaultValueIsReadOnly=False,bDefaultValueIsIgnored=True,bAdvancedView=False,bOrphanedPin=False,)
   CustomProperties Pin (PinId=699AF9D24B3E9A2B89D98E8CD1744C1B,PinName="ReturnValue",PinToolTip="Return Value
Boolean

true on success, false otherwise.",Direction="EGPD_Output",PinType.PinCategory="bool",PinType.PinSubCategory="",PinType.PinSubCategoryObject=None,PinType.PinSubCategoryMemberReference=(),PinType.PinValueType=(),PinType.ContainerType=None,PinType.bIsReference=False,PinType.bIsConst=False,PinType.bIsWeakPointer=False,PinType.bIsUObjectWrapper=False,PinType.bSerializeAsSinglePrecisionFloat=False,DefaultValue="false",AutogeneratedDefaultValue="false",PersistentGuid=00000000000000000000000000000000,bHidden=False,bNotConnectable=False,bDefaultValueIsReadOnly=False,bDefaultValueIsIgnored=False,bAdvancedView=False,bOrphanedPin=False,)
End Object
Begin Object Class=/Script/BlueprintGraph.K2Node_Knot Name="K2Node_Knot_15" ExportPath="/Script/BlueprintGraph.K2Node_Knot'/Game/Blueprints/VideoHUD.VideoHUD:EventGraph.K2Node_Knot_15'"
   NodePosX=512
   NodePosY=1600
   NodeGuid=62938F424112834953AE8F912AC96F75
   CustomProperties Pin (PinId=1994C51943CA84D1943600B701EABC37,PinName="InputPin",PinType.PinCategory="object",PinType.PinSubCategory="",PinType.PinSubCategoryObject="/Script/CoreUObject.Class'/Script/BinkMediaPlayer.BinkMediaPlayer'",PinType.PinSubCategoryMemberReference=(),PinType.PinValueType=(),PinType.ContainerType=None,PinType.bIsReference=False,PinType.bIsConst=False,PinType.bIsWeakPointer=False,PinType.bIsUObjectWrapper=False,PinType.bSerializeAsSinglePrecisionFloat=False,LinkedTo=(K2Node_Knot_12 66B5128049F40FF8FD43F99424426C12,),PersistentGuid=00000000000000000000000000000000,bHidden=False,bNotConnectable=False,bDefaultValueIsReadOnly=False,bDefaultValueIsIgnored=True,bAdvancedView=False,bOrphanedPin=False,)
   CustomProperties Pin (PinId=33A99212418ECF5D0E0356A83C319E64,PinName="OutputPin",Direction="EGPD_Output",PinType.PinCategory="object",PinType.PinSubCategory="",PinType.PinSubCategoryObject="/Script/CoreUObject.Class'/Script/BinkMediaPlayer.BinkMediaPlayer'",PinType.PinSubCategoryMemberReference=(),PinType.PinValueType=(),PinType.ContainerType=None,PinType.bIsReference=False,PinType.bIsConst=False,PinType.bIsWeakPointer=False,PinType.bIsUObjectWrapper=False,PinType.bSerializeAsSinglePrecisionFloat=False,LinkedTo=(K2Node_CallFunction_25 21C7DB4444ADA6B4D92C67AC9A471F27,),PersistentGuid=00000000000000000000000000000000,bHidden=False,bNotConnectable=False,bDefaultValueIsReadOnly=False,bDefaultValueIsIgnored=False,bAdvancedView=False,bOrphanedPin=False,)
End Object
Begin Object Class=/Script/BlueprintGraph.K2Node_VariableGet Name="K2Node_VariableGet_7" ExportPath="/Script/BlueprintGraph.K2Node_VariableGet'/Game/Blueprints/VideoHUD.VideoHUD:EventGraph.K2Node_VariableGet_7'"
   VariableReference=(MemberName="In Time",MemberGuid=B2B4D93349FF3371AE20DA98B0DF8D12,bSelfContext=True)
   NodePosX=768
   NodePosY=1536
   NodeGuid=9A7EB3F24C03D3D62FB74E83726404AC
   CustomProperties Pin (PinId=8D6E0E9A496A52842F621094B83B92A5,PinName="In Time",Direction="EGPD_Output",PinType.PinCategory="struct",PinType.PinSubCategory="",PinType.PinSubCategoryObject="/Script/CoreUObject.ScriptStruct'/Script/CoreUObject.Timespan'",PinType.PinSubCategoryMemberReference=(),PinType.PinValueType=(),PinType.ContainerType=None,PinType.bIsReference=False,PinType.bIsConst=False,PinType.bIsWeakPointer=False,PinType.bIsUObjectWrapper=False,PinType.bSerializeAsSinglePrecisionFloat=False,LinkedTo=(K2Node_CallFunction_25 3BFE43D6427A723A8578D58201A60DB2,),PersistentGuid=00000000000000000000000000000000,bHidden=False,bNotConnectable=False,bDefaultValueIsReadOnly=False,bDefaultValueIsIgnored=False,bAdvancedView=False,bOrphanedPin=False,)
   CustomProperties Pin (PinId=03DD686149EF57E5D090AD8F8DEF2ADD,PinName="self",PinFriendlyName=NSLOCTEXT("K2Node", "Target", "Target"),PinType.PinCategory="object",PinType.PinSubCategory="",PinType.PinSubCategoryObject="/Script/Engine.BlueprintGeneratedClass'/Game/Blueprints/VideoHUD.VideoHUD_C'",PinType.PinSubCategoryMemberReference=(),PinType.PinValueType=(),PinType.ContainerType=None,PinType.bIsReference=False,PinType.bIsConst=False,PinType.bIsWeakPointer=False,PinType.bIsUObjectWrapper=False,PinType.bSerializeAsSinglePrecisionFloat=False,PersistentGuid=00000000000000000000000000000000,bHidden=True,bNotConnectable=False,bDefaultValueIsReadOnly=False,bDefaultValueIsIgnored=False,bAdvancedView=False,bOrphanedPin=False,)
End Object
Begin Object Class=/Script/BlueprintGraph.K2Node_Event Name="K2Node_Event_9" ExportPath="/Script/BlueprintGraph.K2Node_Event'/Game/Blueprints/VideoHUD.VideoHUD:EventGraph.K2Node_Event_9'"
   EventReference=(MemberParent="/Script/CoreUObject.Class'/Script/Engine.Actor'",MemberName="ReceiveTick")
   bOverrideFunction=True
   NodePosX=-1456
   NodePosY=1200
   NodeGuid=AC171D964A5BA19E52333FA9120B0136
   CustomProperties Pin (PinId=856B990F43F65DB7218F02A186ABC6EE,PinName="OutputDelegate",Direction="EGPD_Output",PinType.PinCategory="delegate",PinType.PinSubCategory="",PinType.PinSubCategoryObject=None,PinType.PinSubCategoryMemberReference=(MemberParent="/Script/CoreUObject.Class'/Script/Engine.Actor'",MemberName="ReceiveTick"),PinType.PinValueType=(),PinType.ContainerType=None,PinType.bIsReference=False,PinType.bIsConst=False,PinType.bIsWeakPointer=False,PinType.bIsUObjectWrapper=False,PinType.bSerializeAsSinglePrecisionFloat=False,PersistentGuid=00000000000000000000000000000000,bHidden=False,bNotConnectable=False,bDefaultValueIsReadOnly=False,bDefaultValueIsIgnored=False,bAdvancedView=False,bOrphanedPin=False,)
   CustomProperties Pin (PinId=18BD0FE4427B02059D39ECA4131D5949,PinName="then",Direction="EGPD_Output",PinType.PinCategory="exec",PinType.PinSubCategory="",PinType.PinSubCategoryObject=None,PinType.PinSubCategoryMemberReference=(),PinType.PinValueType=(),PinType.ContainerType=None,PinType.bIsReference=False,PinType.bIsConst=False,PinType.bIsWeakPointer=False,PinType.bIsUObjectWrapper=False,PinType.bSerializeAsSinglePrecisionFloat=False,LinkedTo=(K2Node_MacroInstance_4 5F6482154F1D477FAC5832AAC4FCED53,),PersistentGuid=00000000000000000000000000000000,bHidden=False,bNotConnectable=False,bDefaultValueIsReadOnly=False,bDefaultValueIsIgnored=False,bAdvancedView=False,bOrphanedPin=False,)
   CustomProperties Pin (PinId=D3FCA1754AA67B2B0BB41DB4832F33FF,PinName="DeltaSeconds",PinToolTip="Delta Seconds
Float (single-precision)",Direction="EGPD_Output",PinType.PinCategory="real",PinType.PinSubCategory="float",PinType.PinSubCategoryObject=None,PinType.PinSubCategoryMemberReference=(),PinType.PinValueType=(),PinType.ContainerType=None,PinType.bIsReference=False,PinType.bIsConst=False,PinType.bIsWeakPointer=False,PinType.bIsUObjectWrapper=False,PinType.bSerializeAsSinglePrecisionFloat=False,DefaultValue="0.0",AutogeneratedDefaultValue="0.0",PersistentGuid=00000000000000000000000000000000,bHidden=False,bNotConnectable=False,bDefaultValueIsReadOnly=False,bDefaultValueIsIgnored=False,bAdvancedView=False,bOrphanedPin=False,)
End Object
With that the Unreal Engine implementation is done and we can proceed with setting up our UI.
Getting started - Frontend
We’ll begin by creating an index.html file in the uiresources folder.
Import cohtml.js
To enable communication between the UI and the game, the cohtml.js library must first be imported.
1<body>2 <script src="./cohtml.js"></script>3</body>Setting up the layout
The layout for this UI will be quite simple. We will add a background-image on the body and an element with class of background-filter to apply a filter on the body image.
Additionally, we will define a wrapper to wrap our content and a card-wrapper element to hold our interactive menu card elements.
1<body>2 <div class="background-filter"></div>3 <div class="wrapper">4 <h1>Select A Location</h1>5 <div class="card-wrapper">6 </div>7 </div>8</body>And the styles:
6 collapsed lines
1@font-face {2 font-family: 'Inknut Antiqua';3 src: url('./font/InknutAntiqua-SemiBold.ttf');4 font-weight: normal;5 font-style: normal;6}7
8body {9 margin: 0;10 width: 100vw;11 height: 100vh;12 position: relative;13 display: flex;14 align-items: center;15 justify-content: center;16 flex-direction: column;17 font-family: "Inknut Antiqua", serif;18 background-image: url('./assets/background.png');19 background-size: cover;20 background-position: center;21 background-repeat: no-repeat;22}23
24.background-filter {25 width: 100%;26 height: 100%;27 background-color: black;28 opacity: 0.75;29 position: absolute;30 top: 0;31 left: 0;32 z-index: 1;33}34
35h1 {36 color: white;37 text-shadow: 1px 1px 5px black;38 font-size: 2.5vmax;39 margin-top: 1vh;40 margin-bottom: 0;41}42
43.wrapper {44 width: 90%;45 height: 90%;46 display: flex;47 flex-direction: column;48 align-items:center;49 position: relative;50 z-index: 2;51}52
53.card-wrapper {54 display: flex;55 justify-content: space-between;56 align-items: center;57 width: 100%;58}Adding the animated card styles and structure
The html structure of our cards will be the following:
1<div class="card-wrapper">2 <div class="animated-card skyline-passage">3 <div class="card-content-wrapper">4 <img class="video" src="/Script/Engine.TextureRenderTarget2D'/Game/Blueprints/RenderTargets/skylinePassage_RT.skylinePassage_RT'">5 <div class="card-content">6 <div class="card-content-heading">Skyline Passage</div>7 <div class="card-content-progression">44%</div>8 </div>9 </div>10 </div>41 collapsed lines
11
12 <div class="animated-card meadows">13 <div class="card-content-wrapper">14 <img class="video" src="/Script/Engine.TextureRenderTarget2D'/Game/Blueprints/RenderTargets/verdantMeadows_RT.verdantMeadows_RT'">15 <div class="card-content">16 <div class="card-content-heading">Verdant Meadows</div>17 <div class="card-content-progression">65%</div>18 </div>19 </div>20 </div>21
22 <div class="animated-card twilight-groove">23 <div class="card-content-wrapper">24 <img class="video" src="/Script/Engine.TextureRenderTarget2D'/Game/Blueprints/RenderTargets/twilightGroove_RT.twilightGroove_RT'">25 <div class="card-content">26 <div class="card-content-heading">The Twilight Grove</div>27 <div class="card-content-progression">20%</div>28 </div>29 </div>30 </div>31
32 <div class="animated-card silent-shrines">33 <div class="card-content-wrapper">34 <img class="video" src="/Script/Engine.TextureRenderTarget2D'/Game/Blueprints/RenderTargets/silentShrines_RT.silentShrines_RT'">35 <div class="card-content">36 <div class="card-content-heading">The Silent Shrines</div>37 <div class="card-content-progression">58%</div>38 </div>39 </div>40 </div>41
42 <div class="animated-card neon-horizon">43 <div class="card-content-wrapper">44 <img class="video" src="/Script/Engine.TextureRenderTarget2D'/Game/Blueprints/RenderTargets/NeonHorizon_RT.NeonHorizon_RT'">45 <div class="card-content">46 <div class="card-content-heading"> Neon Horizon</div>47 <div class="card-content-progression">99%</div>48 </div>49 </div>50 </div>51</div>Connecting the videos to the HTML
Connecting the Bink videos to display in our HTML is pretty straightforward, we simply need to copy the Render Target reference from Unreal and add it as the source of our <image> elements:
1<img class="video" src="/Script/Engine.TextureRenderTarget2D'/Game/Blueprints/RenderTargets/skylinePassage_RT.skylinePassage_RT'">Creating the sliced border effect
To achieve the sliced border effect, we’ll use the CSS mask-image property.
For this trick to work, we are going to need 2 images:
- A border image with a transparent center.
- A solid color-filled version of the element.


We’ll apply the border image as a mask on a ::before pseudo-element attached to the main .animated-card element.
This pseudo-element will be slightly larger than the card contents, creating the appearance of an actual border around the card.
9 collapsed lines
1.animated-card {2 width: 18%;3 height: 70%;4 position: relative;5 overflow: visible;6 cursor: pointer;7 transition: transform 0.2s ease-in-out;8 filter: grayscale(100%); // Graying out the inactive cards9}10
11.animated-card::before {12 content: '';13 width: 102%;14 height: 102%;15 background-color: white;16 mask-image: url('./assets/video-border.png');17 mask-size: 100% 100%;18 position: absolute;19 left: -1%;20 top: -1%;21 z-index: 3;22}Note: The background-color on the ::before pseudo-element determines the visible border color.
The actual colors in the mask image are irrelevant, as mask-image only considers solid and transparent areas to define what is shown.
Currenly, our elements should look like this:
To complete the design, we need to add the fill image to the inner section of the video wrapper, which contains the video and its accompanying information.
This inner section is the card-content-wrapper element.
Add the following CSS:
1.card-content-wrapper {2 mask-image: url('./assets/video-fill.png');3 mask-size: 100% 100%;4 overflow: hidden;5}Applying this mask to the card-content-wrapper will hide the top corners of the inner content,
allowing the pseudo-element (with the border effect) to be visible around the edges. This creates the final polished look we want!
You can find the whole CSS source file in the final section.
Trigger hover event from the UI
With the design finalized, the last step is to trigger the Toggle Play event we defined in our Blueprints, sending it the correct video index.
Start by creating an index.js file and include it in the HTML’s <body> section.
In index.js, we’ll loop through all the video elements and attach two event listeners: mouseover and mouseleave.
These will trigger the play/pause functionality when a user hovers over or leaves a menu item.
1const videos = document.querySelectorAll('.animated-card')2
3videos.forEach((video, index) => {4    video.addEventListener('mouseover', (event) => {5        engine.trigger(`TogglePlay`, index)6    })7
8 video.addEventListener('mouseleave', (event) => {9 engine.trigger(`TogglePlay`, index)10 })11})Important: Ensure that the videos in your HTML are in the same order as in the Bink videos array variable defined in your Blueprints.
This alignment ensures that each index matches correctly, so the intended video plays or pauses as expected.
With this the UI is completed!
Full source code
HTML
1<!DOCTYPE html>2<html lang="en">3<head>4 <meta charset="UTF-8">5 <meta name="viewport" content="width=device-width, initial-scale=1.0">6 <link rel="stylesheet" href="styles.css">7 <title>Document</title>8</head>9<body>10 <div class="background-filter"></div>11 <div class="wrapper">12 <h1>Select A Location</h1>13 <div class="card-wrapper">14 <div class="animated-card skyline-passage">15 <div class="card-content-wrapper">16 <img class="video" src="/Script/Engine.TextureRenderTarget2D'/Game/Blueprints/RenderTargets/skylinePassage_RT.skylinePassage_RT'">17 <div class="card-content">18 <div class="card-content-heading">Skyline Passage</div>19 <div class="card-content-progression">44%</div>20 </div>21 </div>22 </div>47 collapsed lines
23
24 <div class="animated-card meadows">25 <div class="card-content-wrapper">26 <img class="video" src="/Script/Engine.TextureRenderTarget2D'/Game/Blueprints/RenderTargets/verdantMeadows_RT.verdantMeadows_RT'">27 <div class="card-content">28 <div class="card-content-heading">Verdant Meadows</div>29 <div class="card-content-progression">65%</div>30 </div>31 </div>32 </div>33
34 <div class="animated-card twilight-groove">35 <div class="card-content-wrapper">36 <img class="video" src="/Script/Engine.TextureRenderTarget2D'/Game/Blueprints/RenderTargets/twilightGroove_RT.twilightGroove_RT'">37 <div class="card-content">38 <div class="card-content-heading">The Twilight Grove</div>39 <div class="card-content-progression">20%</div>40 </div>41 </div>42 </div>43
44 <div class="animated-card silent-shrines">45 <div class="card-content-wrapper">46 <img class="video" src="/Script/Engine.TextureRenderTarget2D'/Game/Blueprints/RenderTargets/silentShrines_RT.silentShrines_RT'">47 <div class="card-content">48 <div class="card-content-heading">The Silent Shrines</div>49 <div class="card-content-progression">58%</div>50 </div>51 </div>52 </div>53
54 <div class="animated-card neon-horizon">55 <div class="card-content-wrapper">56 <img class="video" src="/Script/Engine.TextureRenderTarget2D'/Game/Blueprints/RenderTargets/NeonHorizon_RT.NeonHorizon_RT'">57 <div class="card-content">58 <div class="card-content-heading"> Neon Horizon</div>59 <div class="card-content-progression">99%</div>60 </div>61 </div>62 </div>63 </div>64 </div>65
66 <script src="cohtml.js"></script>67 <script src="index.js"></script>68</body>69</html>CSS
1@font-face {2 font-family: 'Inknut Antiqua';3 src: url('./font/InknutAntiqua-SemiBold.ttf');4 font-weight: normal;5 font-style: normal;6}7
8body {9 margin: 0;10 width: 100vw;11 height: 100vh;12 position: relative;13 display: flex;14 align-items: center;15 justify-content: center;16 flex-direction: column;17 font-family: "Inknut Antiqua", serif;18 background-image: url('./assets/background.png');19 background-size: cover;20 background-position: center;21 background-repeat: no-repeat;22}132 collapsed lines
23
24.background-filter {25 width: 100%;26 height: 100%;27 background-color: black;28 opacity: 0.75;29 position: absolute;30 top: 0;31 left: 0;32 z-index: 1;33}34
35h1 {36 color: white;37 text-shadow: 1px 1px 5px black;38 font-size: 2.5vmax;39 margin-top: 1vh;40 margin-bottom: 0;41}42
43.wrapper {44 width: 90%;45 height: 90%;46 display: flex;47 flex-direction: column;48 align-items:center;49 position: relative;50 z-index: 2;51}52
53.card-wrapper {54 display: flex;55 justify-content: space-between;56 align-items: center;57 width: 100%;58}59
60.animated-card {61 width: 18%;62 height: 70%;63 position: relative;64 overflow: visible;65 cursor: pointer;66 transition: transform 0.2s ease-in-out;67 filter: grayscale(100%);68}69
70.animated-card:nth-child(2),71.animated-card:nth-child(4) {72 margin-bottom: 7.5vh;73}74
75.animated-card:nth-child(3) {76 margin-bottom: 15vh;77}78
79.animated-card::before {80 content: '';81 width: 102%;82 height: 102%;83 background-color: white;84 mask-image: url('./assets/video-border.png');85 mask-size: 100% 100%;86 position: absolute;87 left: -1%;88 top: -1%;89 z-index: 3;90}91
92.animated-card:hover {93 filter: none;94 transform: scale(1.02);95}96
97.animated-card:hover .video {98 transform: scale(1.1);99}100
101.animated-card .video {102 width: 100%;103 height: 100%;104 transition: transform 0.2s ease-in-out;105}106
107.card-content-wrapper {108 mask-image: url('./assets/video-fill.png');109 mask-size: 100% 100%;110 overflow: hidden;111}112
113.card-content {114 position: absolute;115 width: 100%;116 top: 0;117 left: 0;118 color: white;119}120
121.card-content-heading {122 padding: 2vh 2vh 1vh;123 text-align: center;124 text-shadow: 1px 1px 5px black;125 font-size: 1vmax;126 margin-bottom: 0.5vh;127}128
129.card-content-progression {130 text-align: center;131 font-size: 1.2vmax;132 text-shadow: 1px 1px 10px black;133 line-height: 2;134}135
136.skyline-passage .card-content-heading {137 background-color: #312D7A44;138}139
140.meadows .card-content-heading {141 background-color: #54700c6e;142}143
144.twilight-groove .card-content-heading {145 background-color: #24025B6e;146}147
148.silent-shrines .card-content-heading {149 background-color: #3a3c657d;150}151
152.neon-horizon .card-content-heading {153 background-color: #230BA86e;154}JavaScript
1const videos = document.querySelectorAll('.animated-card')2
3videos.forEach((video, index) => {4    video.addEventListener('mouseover', (event) => {5        engine.trigger(`TogglePlay`, index)6    })7
8    video.addEventListener('mouseleave', (event) => {9        engine.trigger(`TogglePlay`, index)10    })11})
Image masks
Video BorderVideo Border Fill